Hello my crafty and creative friends!
I'm back with Part 2 of the Water Coloring Tutorial.
Part 1 showed you how to create the inked background piece
that I'll be using to create a stamped water colored card front,
in the Part 2 video.
(If you missed the Part 1 Video...you can find it in the prior blog post HERE)
I hope that you've got your water coloring tools and supplies on standby
because Part 2 will show you how I water colored
this beautiful BLUE KNIGHT RUBBER STAMPS New Release
WILD FLOWERS image...
and used it to create a card.

This video will share a step by step tutorial with you...
showing you how to crate this water colored piece...
using one of the inked background pieces
created in Video Tutorial Part 1.
*After you watch the video...
read through the rest of the blog post for the photo tutorial
that will show you how the finished water colored
WILD FLOWERS piece...
became a card after the piece dried!
br />
I hope that you enjoyed the video
and are already feeling excited about giving heat embossing
and water coloring a try!
After the piece dried..
I was ready to create a card!
Here's what I did:
I took the water colored piece...

...and die cut it with a
stitched rectangle die.

next...
I chose deep bright pink card stock for the largest mat layer
and
metallic gold to mat the image

I matted the water colored piece
using Scor-Tape
(I like Scor-Tape best when using metallic card stock
to mat water color card stock...
Sometimes...ATG doesn't do the job as well as Scor-Tape,
when it comes to metallic card stock)

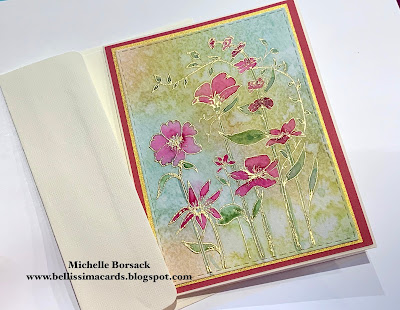
Here's the water colored image matted
with metallic gold
(This Wild Flowers image is so beautiful!)

Next...
I placed the pink mat layer on the scored card
and added adhesive to the back of the gold mat layer

I placed the matted water colored piece onto the pink mat layer

and...
wha-la!
A card!
The image...
The inked background...

Thanks so much for joining me for this 2 part video tutorial
on creating inked backgrounds and water coloring.
I hope that you'll find time to enjoy
creating some beautiful inked backgrounds
and heat embossed water colored cards of your own
real soon.
Wishing you a wonderfully creative day!
Michelle.
I'm back with Part 2 of the Water Coloring Tutorial.
Part 1 showed you how to create the inked background piece
that I'll be using to create a stamped water colored card front,
in the Part 2 video.
(If you missed the Part 1 Video...you can find it in the prior blog post HERE)
I hope that you've got your water coloring tools and supplies on standby
because Part 2 will show you how I water colored
this beautiful BLUE KNIGHT RUBBER STAMPS New Release
WILD FLOWERS image...
and used it to create a card.

showing you how to crate this water colored piece...
using one of the inked background pieces
created in Video Tutorial Part 1.
*After you watch the video...
read through the rest of the blog post for the photo tutorial
that will show you how the finished water colored
WILD FLOWERS piece...
became a card after the piece dried!
br />
I hope that you enjoyed the video
and are already feeling excited about giving heat embossing
and water coloring a try!
After the piece dried..
I was ready to create a card!
Here's what I did:
I took the water colored piece...

...and die cut it with a
stitched rectangle die.

next...
I chose deep bright pink card stock for the largest mat layer
and
metallic gold to mat the image

I matted the water colored piece
using Scor-Tape
(I like Scor-Tape best when using metallic card stock
to mat water color card stock...
Sometimes...ATG doesn't do the job as well as Scor-Tape,
when it comes to metallic card stock)

Here's the water colored image matted
with metallic gold
(This Wild Flowers image is so beautiful!)

Next...
I placed the pink mat layer on the scored card
and added adhesive to the back of the gold mat layer

I placed the matted water colored piece onto the pink mat layer

and...
wha-la!
A card!

THIS is the stuff
that makes my little card making loving heart happy.
The stamp...The image...
The inked background...
The gold heat embossing...
The water coloring.
The colors.
The mat layers.
The gold metallic shimmer.
The ALL make my heart skip a beat.
Thanks so much for joining me for this 2 part video tutorial
on creating inked backgrounds and water coloring.
I hope that you'll find time to enjoy
creating some beautiful inked backgrounds
and heat embossed water colored cards of your own
real soon.
Wishing you a wonderfully creative day!
Michelle.
Loving your videos! It's fun to put your voice with your face after all this time I've 'known' you! Thanks for sharing. I am so eager to do some shopping at Blue Knight. Their stamps are gorgeous!
ReplyDeleteThanks so much Patti!
DeleteSo glad that you're enjoying the videos...and that you survived my big old NY accent!...LOL
Have fun browsing and shopping at the Blue Knight Web site!
Awesome! Thank you for sharing!
ReplyDeleteYou're welcome!
DeleteSo beautiful and in such gorgeous colors. I need more time in the day to try all the things I wish to try. LOL
ReplyDeleteThanks so much Verna...
DeleteYes...you're right!
There's never enough time for us to get lost n our creativity...I agree!
We need to do something about that!
Thank you so much for this video! I can’t wait to give this a try! I told Lynn at Blue Knight Rubber Stamps that the heat embossed barrier reminds me of bumpers at the bowling alley for beginners! You have made this look so doable & fun, with gorgeous results!!! Thanks again!
ReplyDeleteThanks so much Diane...That's a great analogy!..
DeleteIn the video I described them as a little dam....which I think makes it so easy to water color...and build color...without a concern that it will flood out and over your work easily.
You make me smile when you say that the video makes water coloring look do-able and fun...because THAT was what I was hoping to convey...
I wanted those who have been hesitant to water color...watch this video and say...I'M GOING TO GIVE THIS A TRY!
I hope that YOU give it a try...and enjoy water coloring s much as I do!
(Don't forget to share photos over at the BK Fan page on FB!)
Michelle,I finally was able to put aside some quiet time to wait your second video!
ReplyDeleteLove your sparkle gold embossing powder it is so shiny so that has been put on my wish list. I do have three different kinds but they sure don’t have the shine that the sparkle one has ! It really makes the colors pop from the paint ! I have enjoyed my evening watched you twice and have also sent it to two of my friends that I card with here ! They love your work ! Too
Thanks for taking the time and I hope you feel better soon ! Can’t wait to see the next one ! 🎈🐢🎈🐢🤩🤩
HI Therese!
DeleteSo glad that you and your crafty and creative pals enjoyed the videos...
I hope that you'll all give water coloring a try...I'll look forward to seeing what you whip up!
Thanks so much Heidi!...your kind comments are always appreciated!
ReplyDeleteYou are wonderful! You have such an easy way of talking and showing your techniques that I found myself following along like you were right here showing me. I've been in a funk lately, but you have inspired me to get in my art room and create! Thank you for the wonderful video, and your beautiful artwork!
ReplyDeleteThank YOU Laurel!...
DeleteI'm so glad that you enjoyed the video and are inspired to create!
Adios funk ...and hello Laurel ...and some amazing card making!
Michelle, thank you so much for the inspiration! I love your cards and appreciate your tutorials. I can't wait to give it a try!
ReplyDeleteThank YOU Patricia...so happy that you found a little bit of inspiration here at my blog!
DeleteI enjoy your videos, Michelle. You do make it seem easy to create beautiful watercolored cards. I hope you're feeling better! Hugs!
ReplyDeleteThanks Avra...I'm back to feeling like myself..(I think...LOL)
DeleteThis is really easy...I hope that you give the background and water coloring a try...I think you'd do an amazing job creating something beautiful!
Love your videos, you make using watercolors look so easy. Please identify the gold embossing powder and watercolor brands you used, I didn't quite hear the specfic names. Thank you so much!+
ReplyDeleteHI Pat....
DeleteThanks for your kind words...
The embossing powder is by Sparkle N Sprinkle...they have a web site...You'll want to look for Fine Detail/Detail Gold Embossing Powder. I buy the large economy size jar...approx $21-$22 per jar...It last a LONG time. (use the web site search too to look for the gold EP and the economy size jar)
The water color PAN SET that I used for most f the water coloring in this video is from ALTENEW (they also have web site)
I used some Altenew ink pads (greens) for some of the leaf painting> You'll see the pan set and the ink pads on their web site
Love these Wild Flower cards you have made. I have been making very simple cards for years...mainly embossing images and coloring with Tombo markers, then Copic. I started painting with water colors last year and it's my favorite medium. I stumbled upon your cards on Pinterest which brought me to your blog. Your videos are wonderful...so down to earth and sweet. Thank you for sharing your art. I've been making cards since I was a little girl using crayons, glue, and glitter. I never would have imagined all of the beautiful products we can use now. In college I said I "excelled in cut, color, and paste" (art classes) and am still doing it...a lifetime of fun.
ReplyDeleteThank you so much for all of your kind words!
DeleteIm so glad that you found your way to my videos and blog...and enjoy seeing what I create
We (you an I) are very much alike...our ongoing love of water coloring...and creating since childhood..with crayons..glue..scissors and other potentially card and craft worthy goodies we could get our hands on....and aren't we fortunate to have a passion for something that inspires us to create and share our love of card making with others!
Thanks again for taking the time to share such a lovely comment...
Michelle ~ Thank you so much for sharing your tutorials on these beautiful cards! I've been 'playing' with making cards for almost 10 years now and I never dreamed that I could make anything this beautiful, but your wonderful tutorials ~ and your down-to-earth way of sharing have encouraged me to try!
ReplyDeleteGreat video. Beautiful card fronts. I will give this a try. Thank you.
ReplyDeleteYou are AMAZING! Thanks for this video - will be sharing it with my creative compadres. Clear, thorough explanations.
ReplyDeletemerci pour le partage , amicalement viviane/vivi26
ReplyDeleteIts now 2023 and I'm watching this in the UK. I love it. My mum was a watercolour painter and I never tried. I make cards and I WILL be trying this its beautiful and you make me feel I'll be able to do it.
ReplyDelete