Wednesday, November 29, 2017

Baby Bears for Twins

Hello my crafty and creative friends!
I haven't shared a card with you in a while
because...
I haven had time to create a card in a while.
My daughter asked me to create a card for newborn baby twins...
So I made sure to get myself into the studio...
and enjoyed creating today's card.

I knew that I wanted to use a stamp set that I have had since it first came out...
but had never inked up....
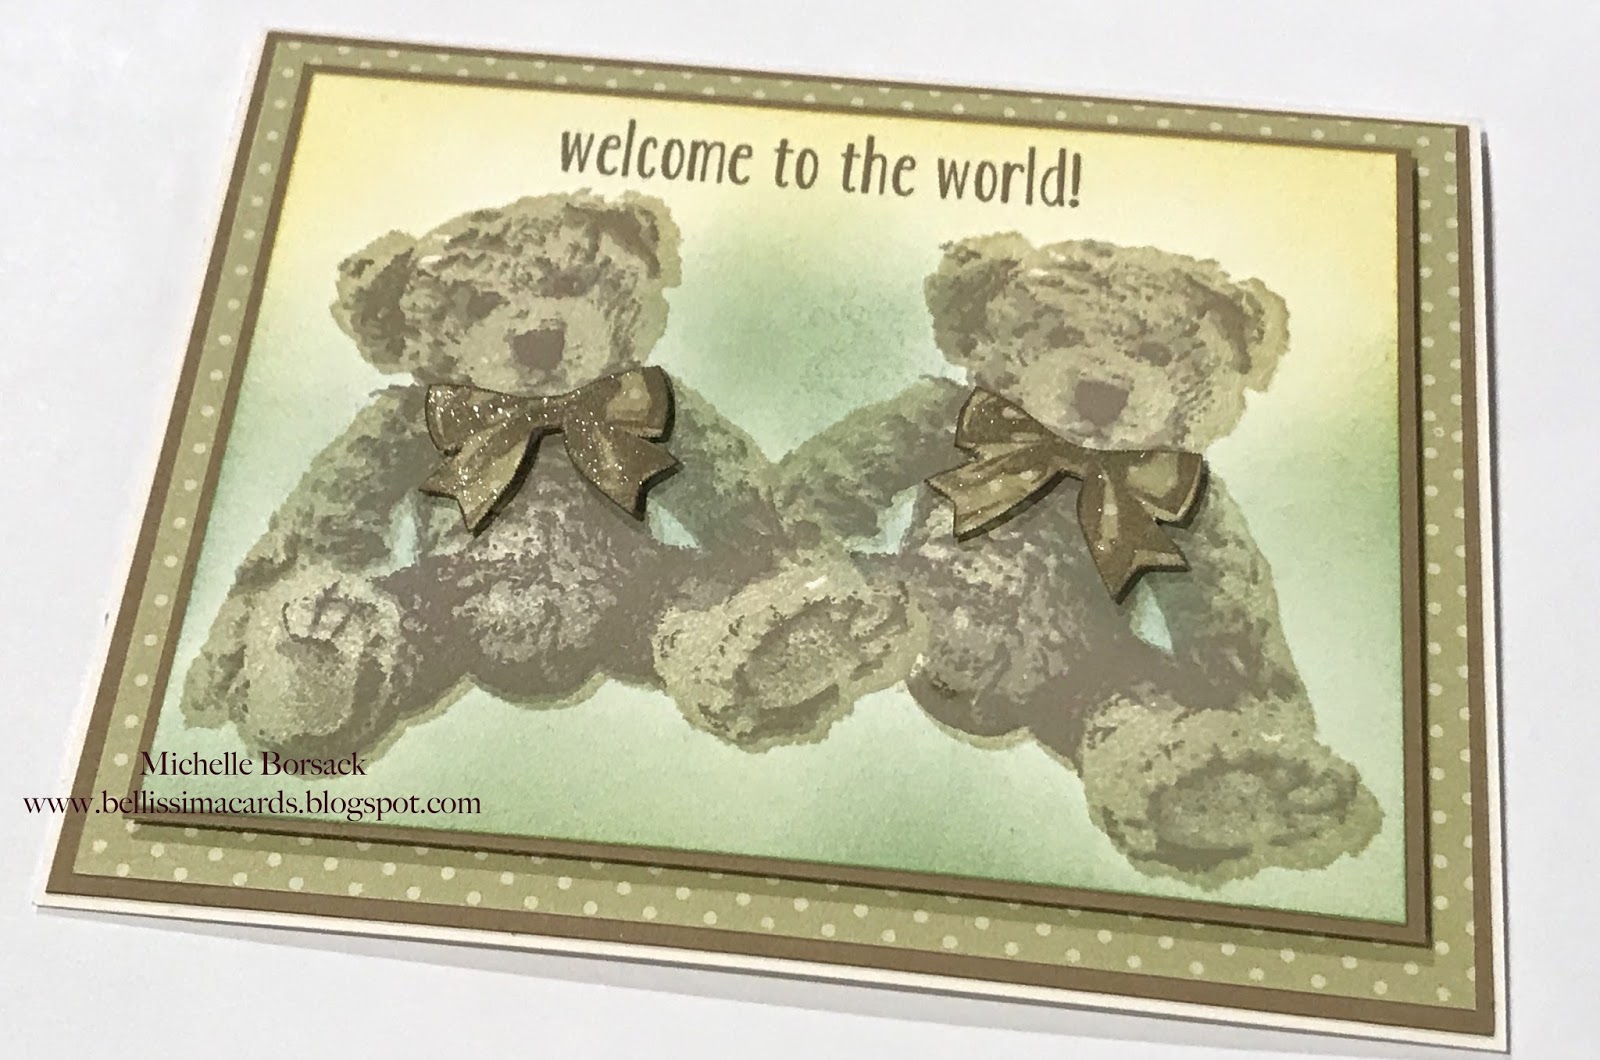
Stampin Up's BABY BEAR.

I also knew that I wanted to create the card in some soft vintage-like colors
I chose three ink colors for the bears..
some dotted print paper...
my Clarity Stencil Brushes
some LCI Kraft card stock for matting..
and this is what I came up with.


I stamped the bear on the left first...
Then masked him..and stamped the bear on the right.
I chose a sentiment from the Baby Bear stamp set
and
Background color was added with ink pads and Clarity Stencil Brushes


I stamped the bows onto the dotted print paper and hand cut them.
Next I inked the edges to finish the bows
and added Clear Wink of Stella to each bow for some shimmer.

I positioned the bows with foam dimensionals.
The print and the image layer were matted with the Kraft card stock
and the image layer was positioned with fun foam.

My daughter was very happy with the finished card
and loved the soft vintage colors that I chose.
as opposed to using l pink and/or  blue..
(familiar and traditional baby colors)

I'm so glad that my daughter had a card request..
because it forced me to make time for card making.

It felt great to spend some time in my studio
and I'm already thinking of my next little project request...
Winter themed bookmarks!

Thanks so much for stopping by today...
Wishing you a wonderful Wednesday!
Michelle.

Monday, November 6, 2017

Wedding Wishes...A Card for a Friend

I've been off resting...
hoping to kick the butt of a flu-type of thing that I've had all week.
while I was doing lots of "NOTHING"...
I had lots of time to think about cards that I'd like to create
when I was feeling better...and able to spend time in my studio again.

Today...I'm sharing one of the cards that I had been thinking of.

First on the list when I got back into the studio
 was a wedding card that a friend asked me to create.
I had all week to envision the card in my crafty little head...
and finally..when I felt a little better...I went right out to the studio 
to make the vision I'd been holding in my head..become a card!

To create this 5x7 card I used the following:
Haute Wedding Dress stamp set (by The Ton)
Loose Peonies stamp set (by the Ton)
Versamark Ink and Fine Detail Gold Embossing Powder
Gansai Tombi Starry Colors
Luminarte Twinkling H2Os
and LCI Metallic card stock for matting.

I started out by stamping and heat embossing the Haute Wedding Dress image.
I water colored the image and background with Twinkling H2Os


While the water colored image was drying
I created a background print with the Loose Peonies stamp set.
The I did a wash of gold from the Starry Colors collection...and let it dry.
Then...I stamped the peony images and leaves onto the same piece of card stock.
I added some color and shading to the peonies and leaves with twinkling H2Os
and let the piece dry completely
while I cut and prepared the 5x7 card...and metallic matting layers.


When the water coloring had air dried on both pieces..
I put the card together...
and this is what I had!
(A card that was exactly as I had envisioned it to be..in my crafty little head!)


 had to take lots of photos to capture the shimmer on the image
 and the floral background.
The gold embossing and shimmery water coloring are so pretty
(Thanks to the Gansai Tombi paints and Twinkling H2Os) 


Lately...I've been creating quite a few backgrounds of my own
as opposed to using print paper.
The more I do this...the more I am liking it.
You can see the shimmery peony background in this photo...
and the metallic card stock matting.


I used fun foam to position the matted image

I stamped the sentiment with a combination of stamps from 
The Ton..Hero Arts and Concord & 9th

I'm very happy with how this card turned out
an am hoping that my friend is happy with it as well.

Thanks for visiting today my crafty and creative friends!
Have a marvelous Monday!
Michelle.

Thursday, November 2, 2017

Let the Turkeys Show You to Your Seat

We are a small family...
Sometimes...Holidays at our house is just the 3 of us...
But..this doesn't mean that I don't keep family traditions...and recipes...
and I never forget to add some personal touches...or go the extra mile...
to make the day memorable.
So..to get started on Thanksgiving plans...
I decided to create a small decorative piece and place cards....
 for the brunch table.

I started out with creating a gold double loop bow
with my DecoFun Bow Maker...
(*The little bow maker that I credit with making a bow maker out of me!!
Me!!...The person who was never able to make a bow...until a few weeks ago...
When I got this fabulous Bow Maker.)
So..I made my double looped bow
(Literally in less than 5 minutes...start to finish)

Next...I stamped the Creative Visions large turkey...and 3 smaller turkeys 
onto ivory LCI Metallic card stock
I cut some small lengths of ribbon
I punched out some tiny tags
and then...
I put all of the parts and pieces together!


And...
This is what I whipped up...
A little decorative tabletop piece...and matching place cards


I think that the bow makes this peace...
and I like the simplicity of stamping in cocoa ink over ivory metallic card stock.

I matted the turkey with chocolate brown metallic card stock...
a nice contrast to the ivory metallic card stock...gold ribbon and bow...
and a nice complement to the cocoa ink.
The Thanksgiving banner was created with Lawn Fawn's Bannerific stamp set
The sentiment words are from the Hero Arts Celebrate Everyday stamp set


and...
I created a place card for each of us...
As it turns out...We will be sharing Thanksgiving dinner with my best friend and her family...
so...this weekend...I'll create 5 more place cards for everyone who we will share the day with)


I really enjoyed putting this little project together...
and am looking forward to creating a few more place cards
for everyone that we will share Thanksgiving dinner with.

I can't help thinking that without my handy little Bow maker..
This project would have been made..
but the beautiful bow would be missing.

If you're wondering where my DecoFun Bow Maker 
and this beautiful ribbon came from...
take a peek at The Ribbon Place.... HERE

Thanks for visiting today...
I'll be M I A for a while..
I've got the flu...and am feeling really crummy...
Aches from head to toe...killer throat and ear pain....sick stomach...and feeling weak
(I'll just have to use my time in bed to think of some ideas for the cards I'll create next week!)
I hope that you've escaped this season's early flu that's going around...
and that you have a wonderful day!
Michelle.


Wednesday, November 1, 2017

GIVEAWAY WINNER!!.... and...Thanksgiving Inspiration from a Bow Making Tool

We have a WINNER!
Theresa D'Amico...

Your name was pulled out of Gary's baseball cap late last night
as the winner of the beautiful HELLO Catherine Scanlon Designs Stamp Set!
Please email your mailing info to me at: tobellissimacards@gmail.com


CONGRATULATIONS THERESA!


and now...
It's time to share today's project!
Since getting the DecoFun Bow Maker
I've been enjoying the fact that I can now make bows! 
(Something that I was never able to say before)

and..
While I am a passionate and dedicated card maker...
I'm finding that being able to make perfect bows 
has inspired me to use some of my creative time working on "other" paper crafting projects!

I've been in the Autumn mode lately...
creating lots of Autumn-y cards../
Thanksgiving cards  ...cards with Autumn leaves...
and Autumn-like inspiring quotes.

Today...I'm sharing a small non-card project...
It's Autumn-y...and allowed me to make a bow!

 I started out with the larger of this Creative Visions turkey stamp
(I have plans already for the smaller turkey...so stay tuned)

In addition to the large turkey stamp....
I got out my DecoFun Bow Maker...
some gold ribbon from The Ribbon Place
Memento Rich Cocoa Ink
and some gold cording.
I also used the Fawn Fawn Bannerific stamp set 
and a Hero Arts Celebrate Everyday sentiment set.

I stamped the large turkey image and colored it with Copics
and cut it out.
Next, I stamped and cut out the banner...and the word "Happy" separately
I created a gold bow...
and cut and scored a small base card using LCI dark brown metallic card stock
I positioned the turkey so that it extended beyond the top of the base card.
The sentiment banner was positioned with foam dimensionals.
I used a brown marker to edge the word "Happy" with brown ink
then positioned it with foam dimensionals.
Next...I attached the double looped bow to complete this piece.
I attached the completed piece to a long narrow wood pick/skewer 

I've chosen to use this as a floral pick...for a pot of Mums
and will write a Thanksgiving greeting on the inside of the card.
This piece can also be used as a gift bag tag.
I am thrilled with the bow...and still can't believe that I can now make bows!
for making a bow maker out of bow-challenged me!
PS...This gold double looped bow took me approximately 4 minutes to make
Honestly.
That's an amazing thing for me...who was never able to make a single loop bow...
never mind  a double loop bow!

I really enjoyed creating this floral pick/gift bag tag/card...
and am looking forward to creating more ribbon and bow related projects 
in the future.
I've already got plans for the smaller turkey image...
and would love it if you visit again tomorrow 
to see what Ive got up my crafty little sleeve!

If you're wondering where you can find the DecoFun Bow Maker...
It's right HERE...at The Ribbon Place!

Thanks for visiting today my crafty and creative friends!
Have a wonderful Wednesday!
Michelle