Wednesday, February 27, 2019

Video Tutorial Part 2: Water Coloring Blue Knight Rubber Stamps Wild Flowers Stamp

Hello my crafty and creative friends!

I'm back with Part 2 of the Water Coloring Tutorial.

Part 1 showed you how to create the inked background piece
that I'll be using to create a stamped water colored  card front,
in the Part 2 video.
(If you missed the Part 1 Video...you can find it in the prior blog post HERE)

I hope that you've got your water coloring tools and supplies on standby
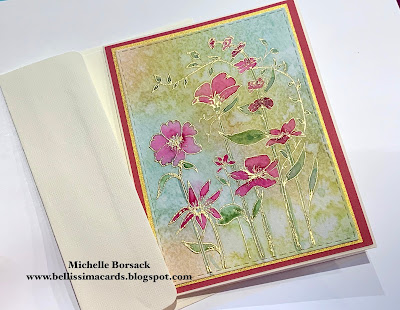
because Part 2 will show you how I water colored
this beautiful BLUE KNIGHT RUBBER STAMPS New Release
WILD FLOWERS image...
and used it to create a card.

This video will share a step by step tutorial with you...
showing you how to crate this water colored piece...
using one of the inked background pieces
created in Video Tutorial Part 1.

*After you watch the video...
read through the rest of the blog post for the photo tutorial
that will show you how the finished water colored
WILD FLOWERS piece...
became a card after the piece dried!
br />

I hope that you enjoyed the video
and are already feeling excited about giving heat embossing
and  water coloring a try!

After the piece dried..
I was ready to create a card!

Here's what I did:
I took the water colored piece...

...and die cut it with a
stitched rectangle die.

next...
 I chose deep bright pink card stock for the largest mat layer
and
metallic gold to mat the image

I matted the water colored piece
using Scor-Tape
(I like Scor-Tape best when using metallic card stock
to mat water color card stock...
Sometimes...ATG doesn't do the job as well as Scor-Tape,
when it comes to metallic card stock)

Here's the water colored image matted
with metallic gold
(This Wild Flowers image is so beautiful!)

Next...
I placed the pink mat layer on the scored card
and  added adhesive to the back of the gold mat layer

I placed the matted water colored piece onto the pink mat layer

and...
wha-la!
A card!

THIS is the stuff 
that makes my little card making loving heart happy.
The stamp...
The image...
The inked background...
The gold heat embossing...
The water coloring.
The colors.
The mat layers.
The gold metallic shimmer.
The ALL make my heart skip a beat.


Thanks so much for joining me for this 2 part video tutorial
on creating inked backgrounds and water coloring.
I hope that you'll find time to enjoy
creating some beautiful inked backgrounds
and  heat embossed water colored cards of your own
real soon.

Wishing you a wonderfully creative day!
Michelle.

Sunday, February 24, 2019

A VIDEO TUTORIAL: Creating Backgrounds with Ink...for Water Color Card Making

HI Everyone!
Today...I've got the video tutorial that you've asked for!

But first..I have to say...
Wow!
I was so surprised and felt so much love 
from hundreds and hundreds of people 
who visited my blog ....sent me private messages...
shared comments on Facebook...
and joined The IncrEDIBLE Shrinking Mom Facebook group yesterday!
WOW...
Gary and I are so appreciative of your kind words 
and the congratulations sent to us 
with regard to our weight loss journey
and the upcoming launch of (The IncrEDIBLE)
If you're on a weight loss journey of your own...
would like to follow our incredible journey...
or would like to incorporate healthy eating into your food life
come join us HERE...
at The IncrEDIBLE Shrinking Mom's Facebook page.
You won't want to miss any of the monthly recipe collections 
that will be available soon.

I wanted to say THANK YOU before getting back to card making talk!

I shared a few water colored  cards on Facebook last week...
created with Blue Knight Rubber Stamps New Release stamp set called...
WILD FLOWERS.
This stamp is delightful to create cards with
and looks particularly beautiful when water colored, I think.
I'll show you the cards...again...and then will share the video below


When I shared the cards here on my blog...
and at numerous groups on Facebook...
I received lots of questions about how I created the card...
and lots of requests for a video tutorial.
So..today..while working on some cards out in my studio...
I thought...let me put together a quick impromptu video
focusing on creating the inked background for the water colored card.
So..today...I've got this PART 1 video.
I'll do PART 2 later this week 
where I'll show you how I embossed and painted the image

Today I'm sharing Part 1
Creating Water Colored Background with Distress Ink

Here ya go!
Enjoy!
(Put on your seat belt...
because I am a fasssst talkin' New York girl
who was at her fastest speed racer talking best in this video...)

If you're loving the WILD FLOWERS stamp as much as I do...
You can find it HERE...
at the BLUE KNIGHT RUBBER STAMPS web store.
The brushes can be found by doing an AMAZON search for
TOOTHBRUSH STYLE MAKE-UP BRUSHES
Distress Ink and Distress Oxide Ink can be found at lots of crafting web sites 
and in most craft and stamp shops.

SPECTRUM NOIR AQUA (Water Color paper)
can be found HERE at the CRAFTER'S COMPANION web site
The craft mat is called:
THE BEST EVER CRAFT MAT BY KEN OLIVER
You can see Ken's video about the mat HERE

Please know that I am not an affiliate of these companies...
I'm just happy to share some great product info with fellow card makers.
(AKA...I am an "enabler")

Thanks for visiting today..
Check back in during the week for the Part 2  tutorial
that will show you how to emboss and water color the stamped image.

Have a great day!
Michelle. 

The IncrEDIBLE Shrinking Mom....and...Beautiful Card Stock Colors Aren't Just for Card Making.

Card stock colors are not just for card making!  


I'm so excited!...
I've lost 99 lbs...and he has lost 83 lbs...
As some of you know...my sweetheart and I have been on a weight loss journey....

Our Journey will continue as we strive to continue to lose...and become healthier...
Our Weight Watcher lifestyle is one that we love...
We've had one another for support
and are amazed at the transformations that we've seen in one another...
and in ourselves.
When we joined WW last Spring...

I told Gary that I refused to serve us a piece of plain broiled chicken and steamed string beans for dinner.

I vowed to keep the food part of our lives interesting

and so...
Throughout our journey 
I have been dedicated to creating recipes that are delicious..healthy...
and above all....compatible with our WW life....
Our friend and family cannot believe what we eat...
and that we have lost weight eating like we do!

We eat great food...
We never feel hungry...
and best of all...
I still get to enjoy cooking and baking and creating my own recipes...
A passion that I didn't want to forfeit when we embarked on this journey.
Let's face it..
you CANNOT take the wooden spoon out of the hands 
of a nice meatball rolling, sauce stirring Italian girl.
That would be a battle that would go down in history.

So...I've been spending lots of time in the kitchen having a fantastic tie creating so many new recipes..
and have, one by one...re-vamped an tweaked up many of my family recipes
handed down to me by my Grandma and my Mom.
In other words...
There are no celery sticks...
baby carrots...
dry salads
and above all..no plain broiled chicken and steamed string beans on our dinner plates!

I cook.
We eat.

We lose weight.


As we've lost our weight on this amazing journey
so many people have asked me to publish a cook book.
and so..
As part of my continued journey 
and at the request of many people 
who are interested in the recipes that I've created that are WW friendly...
I'll be starting a small recipe related business...
And...
here's what's exciting me tonight...
(Yes..the card maker in me has inserted herself into the recipe creators life!!)
I've finalized the logo and graphics details with the graphics person...
And..
I've submitted color samples to her for the color palette for the project...
And.
Thanks to Gina K's gorgeous card stock colors..
it was so easy for me to commit to a color palette...
These gorgeous colors "feel" right to me...
They're gorgeous, I think.
and...
I'm going to love using these colors for anything and everything 

card stock-ish that's related to 
"The IncrEDIBLE Shrinking Mom"!

So, you see...
card stock is not just for card making!

Inspiration is all around us...
Nature inspires color and creativity...
and in this case...Gina K's card stock has inspired me!

But the inspiration doesn't end there...
Gary and I inspire one another in countless ways.
The friends we have made in our weekly WW meetings 
inspire us beyond measure.
Looking at our transformations inspire us.

and...when I sent the photo on the left to my daughter one day recently via a text...
she texted me back saying...
"Mommy...I looked at the picture on my phone and didn't recognize the person.
Then I thought...OH..That's my Mother...
That's my incredible shrinking Mom!!"
now if that's not inspiring...
I don't know what is!

SO now the waiting begins...
I can't wait to see what the graphics person comes up with...
given the ideas and sketches I've provided!

As a person who has been a card maker for decades...
I am always in awe of all of the countless places...things...events...etc 
that can inspire creativity.
For me...
much of my love of color comes from nature...
because...as I always say...
"No one does it better than Mother Nature"
In this case..the color palette inspiration
came from Gina K's beautiful card stock colors.

But...
While I'm waiting...
I wont be idle.
There are recipes to be created...and tweaked.and tested...and tasted.
There are pounds to lose...new clothes to buy...
Walks to be taken...steps to be logged into my FitBit
and goals to achieve.

If you wan to travel along with Gary and I 
on this wonderful  and amazing journey
you can join me HERE...
on Facebook...

And stay tuned...
Because the first monthly collection of recipes will be coming out ...soon!

Thanks for visiting..
and thanks for reading about our journey.
Michelle
(The IncrEDIBLE Shrinking Mom)

Saturday, February 23, 2019

Pet Sympathy Card

I've got a quick little blog post today...
To share a few photos of  pet sympathy cards
that my friend, John...
who is a vet...
 asked me to create for him.

His specific request was something simple...
low key...
and CAS.

He expressed that he had liked this stamped image in the past... 
when I created pet sympathy cards for him...
and he asked if i could use the image again.
So...I did.

I stamped 12 of the image to create a stack of 12 cards
 using Ranger's Potting Soil Archival Ink
to stamp out this sweet image from a stamp set called DOG SYMPATHY
by Our Daily Bread Designs
(now known as Divinity Designs)
I brushed on some light green ink in the grass and leafy areas
and added some color to the scattered flowers
I matted the image in a deep chocolate brown card stock...
and chose black card stock for the largest mat layer.

I make pet sympathy cards now and then for another vet...
and a while back I had put together a Rainbow Bridge prayer card
that I had professionally printed...
so...
 I offered my friend John the opportunity to enclose a Rainbow Bridge prayer card
inside each card when he sends them.

I love the images on the front of this prayer card.
It includes cats..dogs...rabbits...birds and a little child sitting on the shoreline.
I'm really happy that I had them made 
as an insert for the pet sympathy cards that I make.

I sent a few preliminary photos to my friend when the cards were complete...
and he was really happy with them...
particularly because I used an image that he loves.

I'm glad that John will have cards that he loves
to send to the families of a "patients" of his that have passed away.
He is a thoughtful and caring vet and as in the past...
he preferred that the cards be blank inside
so that he can include a personal handwritten note
when he sends each card.


I enjoyed creating this stack of cards for my friend John.
The stamped image is very sweet...
and works well for a pet sympathy card, I think.

Thanks for visiting today
Have a wonderful and creative day
my crafty and creative friends!
Michelle.

Thursday, February 21, 2019

A Die Cut Leprechaun for St. Paddy's Day

Hello my crafty and creative friends!
My St. Patrick's Day card making is winding down.
But...
Before I move on to doing some floral water coloring
I have one last Cricut-die-cut St. Paddy's Day card to share with you.

And...
It's THIS cutie!
I had THE best time designing and creating a short stack of this card.
At first, I cut the parts and pieces to make just one leprechaun..
thinking that it wold be tedious to put together.
One wold be enough..I thought.
But...
Cutting and putting together all of the leprechaun's layers
wasn't tedious at all...
(A pleasant surprise)
So...I cut out a bunch more and created a nice short stack of cards 
created with this adorable little guy in the spotlight!
I had this pretty golden shamrock print set aside...
waiting for just the right card making moment to use it.
and...
This card seemed like the right moment!
I kept the colors of Ireland as the color palette
for this card...
an chose gold metallic card stock as the largest mat layer
to complement the gold shamrocks
I matted the shamrock piece and positioned it with fun foam
for added dimension.


This little guy makes me smile!
and...
I have to say...
After completing the short stack of leprechaun cards
I was kinda sad to see the leprechaun making come to an end.
I really enjoyed designing and creating this card
from start to finish!


So...now...
with my 2019 St Patrick's Day card making complete...
I'll be heading out to my studio to do some floral image water coloring.
(A friend asked for quite a few water colored floral cards...
Water coloring is something that I love to do
So this next card making project will keep me happy and busy
...at least through the weekend)

What's on your card making agenda today?

Thanks for visiting...
Have a terrific Thursday!
Michelle.

Wednesday, February 20, 2019

Happy St Patrick's Day...Die Cutting and Layering to Create a card

Hello my crafty and creative friends!

I've been enjoying making St Paddy's cards with my Cricut
which means that I've got another St. Paddy's day card to to share!

One for the things that I've been enjoying...
is editing and customizing images from Design Space.
The shamrocks shown on this card allowed me to have fun doing that!
I love taking a DS image and creating an edited version that is card front sized.
and it's extra fun when there are (lots) of layers needed to complete the image.
That's what I did when creating this card.
This card actually has 7 layers of card stock and paper...
Yes...7!
I also chose to use a basket weave embossing folder 
to add some texture to one of the card stock layers

I stamped the Sentiment on to white  card stock
then hand cut the double ended banner.
The sketchy shamrock print was ideal for this card, I think.
The sentiment piece...the shamrocks...
and the matted shamrock and basket weave piece
were all positioned with fun foam and foam dimensionals.
(Yes...lots of dimension for this CAS card!


I'm happy with how each element..the color palette...
and the texture and dimension all came together
to create this St Patrick's Day card.
Creating a short stack of this card was lots of fun!

I've still got one more stack of a St Patrick's day card design 
that I have in mind to create...
and then I need to get busy with replenishing my stash of Birthday...Thank You...
Sympathy and Get Well cards.
How about you?
What's on YOUR card making agenda?

Thanks for visiting today...
Wishing you a terrific Tuesday!
Michelle.

Tuesday, February 19, 2019

Irish Blessings

March is on the way...
and that tells me that it's time to create 
a few St. Patrick's Day themed cards!

This year
I've decided to use the Cricut
to create die cut St. Patty's Day cards.
I recently picked up some nice print paper 
that I knew would be perfect for St. Patty's cards...
so I got busy creating with some card s tock...some prints...
and my trusty Cricut.
.
Today I'm sharing a few cards with 2 different Irish Blessings.
I created a short stack of each card design.

I chose this simple but beautiful sentiment 
for this card.
The 2 layer shamrock frame was originally a round frame.
I altered/edited the shape to create an oval
which I thought would be a nice look for this blessing.
I used this sweet shamrock print 
and matted it with orange card stock.
The sentiment was stamped...
then die cut with an oval cross stitched die
and attached to the shamrock frame.
Next...I used fun foam to position the framed sentiment piece
for added dimension.
To finish the card.I added one small emerald green rhinestone
to the sentiment piece.

You can see the dimension/lift created
by using fun foam when placing the shamrock frame.


The second Irish Blessing card that I created
used a different sentiment...
one that I have always loved.
I used the same print..and oval shamrock frame
as well as the oval cross stitched die 
when creating this card.

Because this sentiment was larger and die cut with a larger cross stitched die..
The light green shamrock frame layer isn't visible.
I was totally okay with that
and was happy with how this card looked after the blessing was placed onto the frame.
As with the card above...
I used fun foam on this card 
when positioning the assembled sentiment and frame piece..
and finished this card with a small emerald green rhinestone as well.

I look forward to creating a few St Patty's Day cards every year.
Using the Cricut for the cards has been fun!
And each time I use the Cricut..I'm learning a little bit more about
all that it can do.

I'll be back again in a day or two 
to share another St. Patrick's Day card!
Hope to see you then!
Michelle.

Sunday, February 17, 2019

2019 Valentine Day Card Making

Today I've got a quick blog post to share.

When I'm not creating inked, colored and painted cards...
I'm usually creating cards with my Cricut maker or Explore.
Cricut card making is kinda new to me.

While I've owned numerous Cricut machines
since the very first one came out 15+ years ago...
the truth is...I NEVER used any of them.

Last Fall..I decided to FINALLY take the plunge...
and familiarize myself with my two newest Cricut machines..
The Explore...and the Maker.
After my first cut...I was IN LOVE with both machines!
And then I thought...
WHY did I NOT allow myself to enjoy using a Cricut LONG ago(?)

I will always love love love stamping...coloring..and painting cards
but now...I've added creating cards with the Cricut...to my repertoire.
I've always been a very CAS card maker...
and creating cards with the Cricut allows me to create VERY CAS cards...
which I love!

I created quote a few Valentine cards last month with the Cricut
but dint share them here at my blog
because I didn't want some of the recipients to see them prior to receiving them.
But now...with valentine's Day over...
I can share them!
I created a short stack of each card design..
and in the end...I had 28 cards.

So here we go...
My 2019 Valentine cards!

How about this cutie?
I used an assortment of prints for variety.


After creating a short stack of elephant cards with assorted prints...
I decided to create a few with foil and glitter card stock


Next.. I created a stack of this beautiful intricately cut card


And...then...a short stack of this card...
with an assortment of prints.


And...then...I created a short stack of this beauty!
I LOVE this die cut design...
I love all of it...The flourish-y heart
and the great font for the lettering.

and finally...
I created a stack of this shiny sparkly LOVE card
with foil and glitter card stock.


So...what do you think?
Do you have a favorite?

While traditional card making...
(stamping....inking...coloring...painting etc)
will always be my first love...
with water coloring being at the top of the list...
I'm really happy to have found that I REALLY  enjoy
creating cards with the Cricut.
It's nice to add some variety to my card making
and this new found love of sing the Cricut keeps my creative inclinations 
fresh and new.
(A good thing I think!)

Now..with Valentine's day over...
I'll be moving on to St Patrick's day card making...
with my Cricut!

Thanks for visiting today...
Have a wonderful Sunday, my crafty and creative friends!
Michelle.