It's Day #3 of Blue Knight Rubber Stamps New Release Week and Giveaway here at my blog and I'm excited to share another new stamp set with you!
I've created 2 cards with the Cowgirl and Cowboy stamp set.
I love that 4 of the
New Release stamp sets have a large image and a mini image o the main stamp.
For me, as a card maker, this opens up some great possibilities!
Today's cards show an example of cards created with each of the images: one large and one mini.
Minis are awesome for pairing with large sentiments or quote stamps.
Because of their size, they leave enough card stock space for a larger sentiment stamp, especially on A2 cards...which sometimes seem to run out of stamping space when using a large image.
If you prefer to create with smaller images, the
May New Release also includes a stamp set of JUST the Cowboy Minis.
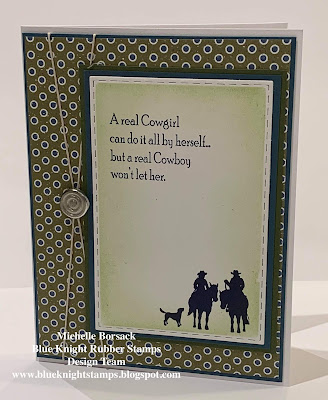
Let's take a look at today's Cowgirl and Cowboy cards.
I am a very CAS (Clean and Simple) card maker and when I create cards like this one they feel "right" tome...they feel neat...and tidy...and balanced....and very CAS.
I used the stitched rectangle die as a guide when placing my stamps into my stamp positioning tool.
In other words...I placed the card stock into my MISTI, then placed he die on top of the card stock, THEN, I placed the stamps in position, within the die space.
I removed he die and stamped the images using Midnight Navy ink.
(I LOVE how the silhouette image turned out with using the Navy ink.
As with any silhouette image stamping...getting a dense solid spot-free image is key, so I stamped and re-inked this image with the navy ink 5 x's. (Yes!..The beauty of using a stamp positioning tool!)
When I was happy with the image, I used the stitched rectangle die to die cut the image piece..
After he image piece was die cut, I left the card stock in the die and used the die itself as a stencil for doing some light green inking around the edges of the image card stock piece.
When I removed the die, I had a nice crisp white border around the edges of the inked image piece.
I chose a print and matted the image and print with with navy card stock.
Before positioning the matted print piece, I added some twine and a silver button-like embellishment.
The matted image piece was positioned with fun foam for added dimension.
I'm loving this card and am so happy that I chose to stamp the silhouette with navy ink, as opposed to
creating a usual traditional black ink silhouette.
Do you see what I mentioned above about the Mini sized images being ideal for sharing card front space with a larger sentiment?
(This sentiment isn't even THAT large...(I use lots of REALLY large sentiment and quote stamps sometimes) The mini stamped image leaves lots of room for really large sentiments on A2 card fronts.
The second card that I'm sharing today was created with the larger image from the
Cowgirl and Cowboy stamp set.
I started by creating the stamped background.
I chose the Silhouette Forest stamp set because I liked that the branches would frame the stamped image.
I used a few different ink colors to stamp this image: A brown for the branch portion...some green and rd for the leaves...and a deep green for the evergreen trees at the bottom of the image.
After the Silhouette Forest image was stamped, I used the
Heidi Pettie Cloud Stencil to add some clouds to the sky.
(I used a few different Distress Ink Colors to do this...some blues and a purple)
After I had finished creating the background piece, I stamped the Cowgirl and Cowboy image with Gina K Black Amalgam Black Ink and die cut it with a stitched rectangle die.
As with the card above, I used the die as a stencil to add some inking and the inked clouds
I chose metallic green and navy card stock for each of the mat layers.
I positioned the matted image piece with fun foam for added dimension.
You can see all of the detail and design elements of this card in this photo..
The clouds...the mat layers...the inking..and the offset positioning of the background piece and the image piece.
So what do you think of today's cards?
Are you loving he Mini image as much a I do?
(I think that including a mini in 4 of the New Release stamp sets is both insightful and pure genius on the part of Blue Knight Rubber Stamps that demonstrates their understanding of what card makers need.....and like)
You'll find The Cowgirl and Cowboy stamp set, the Silhouette Forest stamp set and the Cloud Stencil
HERE, at the Blue Knight web site.
One final tip:
Don't forget...When doing silhouette stamping...remember to ink...stamp...re-ink...stamp...re-ink stamp and continue to do so until you have a solid, dense spot-free image.
This may take 4...5..6 re-inkings and re-stampings...but it will give you a true great looking silhouette image.
SO stamp away...re-ink until your heart's content...and then stand back and admire the silhouette image that you've created
About the Giveaway:
If you've got a USA mailing address, don't forget to leave a comment below for an entry into this week's giveaway(s)
At the end of
Blue Knight Rubber Stamps Week, I'll announce the winners of these 2 Giveaway bundles, here at my blog.
Thanks for visiting today, My crafty and creative friends!
Let's meet tomorrow...sale time...same place for Day #4 of
Blue Knight Rubber Stamps New Release & Giveaway Week, here at my blog
Wishing you a wonderful Wednesday!
Michelle.


