Monday, February 26, 2018

Day #2...Creating Cards with a Giveaway Winner Package of Ken Oliver Ink...Brushes and Stencils by The Crafters Workshop

Hello my crafty and creative friends!
I'm back today to share 2 more cards that I've created with the wonderful goodies that I won
when Ken Oliver did a Giveaway...a few weeks ago!

Here's what was in the Giveaway package
(SO many amazing things!)


For today's cards....I wanted to do some color blending and layering.
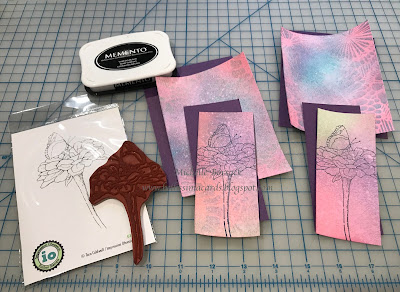
I applied the ink with a blending tool 
onto a card front sized piece of Ultra Smooth (Spectrum Noir) card stock
making sure to get a good solid coverage of inked color

Next I positioned and secured one of The Crafters Workshop stencils with painters tape
and used the Stencil Brushes to apply the inked stenciling.

When I had the depth of ink color that I wanted...I gently removed the stencil
and lightly spritzed the inked piece with water...
The Color Burst Inks are reactive...
and I was excited to see how the inked card stock would look when misted!
**I made sure to hold the mister a good distance from the inked piece...
(aka...an arms length)


When the piece dried....I was very happy with how the ink looked!
Emphasis on VERY HAPPY
I love the layered inking and how the ink looks after it reacts to water.

I trimmed the inked pieces...cutting each one to the size needed.
I also cut mat layers for each inked piece
I stamped a floral image on the smaller inked pieces
with a pretty IO stamp that I love...and have used many times before.

I attached the inked pieces to their corresponding mat layers.
The larger mat layers were attached to the base card


The smaller inked and stamped pieces were matted first...
and then I attached fun foam to the back for added lift and dimension.


I chose sentiment stamps and dies for each card


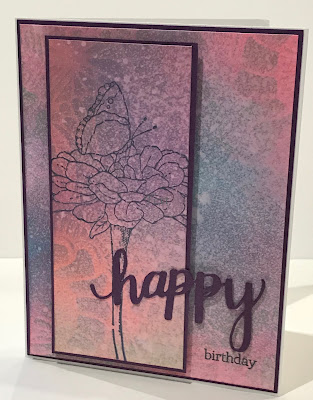
First....a Happy Birthday card
I used the same purple metallic card stock that I used for matting...
to create a die cut "happy".
I stamped "birthday" in the lower right corner of the card front to complete this card.


I also created a "prayers" card.
I stamped and matted the "prayers" piece and positioned it with foam dimensionals.
"For You" was stamped directly onto the larger inked layer.

I am loving the beautiful Color Burst ink pads...
The colors are so pretty...
they layer beautifully...
and their reactive qualities are terrific.
It was lots of fun creating both of today's cards 
with the Color Burst Inks...and the stencils from The Crafters Workshop.
Adding the die cuts and stamping allowed me to create the cards 
that I had envisioned in my mind when I began creating each card. 

I have another card in mind for the Color Burst Ink pads
and am looking forward to the next time that I can spend some time in the studio
and will be able to give that card a try!

Before you run off to order your set of Color Burt ink Pads...
Let me say...
Have a great day, my friends!
Thanks so much for visiting!
Michelle

Sunday, February 25, 2018

A Fantastic Giveaway to Win! ...Color Burst Ink Pads & Stencil Brushes and The Crafters Workshop Stencils

I was recently the winner of a wonderful giveaway sponsored by Ken Oliver Crafts
and today, I'm sharing the first card that I've created 
with the wonderful goodies included in the giveaway!
  There's lots to be excited about in this bundle of gorgeousness...
Ken Oliver's Color Burst Ink Pads
The Crafters Workshop Stencils
and....Ken Oliver Stencil Brushes.

It's been a very long time since I've created a stenciled card...
so I thought that the first thing that I'd create would be a stenciled card...
with the flamingo stencil that caught my eye.

I positioned the stencil over the card stock
securing it with painters tape.


I used a Stencil Brush to pick up ink from the Fuchsia Ink Pad
and brushed it over the stencil until I had the depth of color that I wanted.
I reloaded the brush with ink multiple times to get good ink transfer.


I added some Chartreuse Ink and Turquoise Ink to complete the stenciling.
When the inking was complete...I gently removed the tape
to reveal the completed flamingo image.

I used a tissue to gently buff the image...
(Something that I always do when inking)...
To make sure that the ink is "dry" and won't rub off onto my hands..or the card, as I create it.
As you can see...the tissue remained clean...no evidence of ink ...
Thumbs up to Ken Oliver for this...
(not all inks are this clean to work with)

I chose a Hero Arts Stamp and Cut stamp and die set for the sentiment piece.
And matted both the stenciled image and die cut sentiment with deep blue metallic card stock.

I used Scor-Tape to secure fun foam to the back of the matted image piece.
I chose to use fun foam for added dimension.


After the sentiment banner was matted...
I added foam dimensionals to the back of the banner.


I used a black Sharpie to color the edges of the white dimensionals
to make them invisible when the card is put together.
(My little trick that I do....For when the recipient handles it & looks at it...
and might have seen the white dimensionals behind the sentiment banner)

I love using sentiment banners on card fronts!

I added clear Wink of Stella to each flamingo...for a little bit of sparkle 
Then positioned and adhered the  sentiment banner to complete the card 


I enjoyed stenciling this card...
As I mentioned above...It's been a long time since I've created a stenciled card.
The new Ken Oliver Color Burst Ink Pads are wonderful.
The colors are beautiful...
the ink transferred nicely with the  Stencil Brushes.
The Flamingo stencil was fun to work with...
(so glad that I chose to use it for the first project that I created 
with this amazing giveaway prize package!)

Thanks so much for visiting today, my crafty and creative friends!
I am already thinking of a second card project for these Ink, Brushes and Stencil goodies...
so be sure to check in tomorrow to see what I've got up my sleeve!

Have a wonderful day! 
Michelle.

Monday, February 19, 2018

Back in the Studio!

Hello my crafty and creative friends!
I've missed all of you these last 2 months!

My last blog post was right before Christmas...
and since then...I have had the flu twice and have spent the remainder of my time 
purging...tidying and reorganizing my studio.

With my studio FINALLY being back in order this week
I was looking forward to getting back to creating!

As it turned out..
I got the studio back in order just in time..
because yesterday I was asked to create a few dozen basic book marks.

I had to get the book marks done relatively quickly.
I chose the stamps that I wanted to use..
Got out some ink...card stock...ribbon...twine...
markers... pencils...and metallic card stock for matting.

And this is what I came up with
(WARNING: The photos are just so-so.....sorry about the bad lighting)
Actually...
After not sharing something ...anything...here at my blog for 2 months...
I must be "rusty" 
because I forgot to take the photos before I placed each book mark 
into it's cellophane sleeve.
So...in addition to poor lighting...
we have photo-glare...from the cellophane sleeves!

Anyway...here we go...
The book marks in the first three photos were created
with Gina K's MY ANCHOR stamp set
This stamp set has lots of really great images an sentiments.

The anchor image has lots of nice detail...
and a beautiful sentiment to match

I love this little scene...
I added some color with Copic markers


I paired an IO quote stamp with the Gina K lighthouse.
I added some color highlights with Copic markers to the lighthouse


This book mark was created with a Dina Wakley stamp set...by Ranger


The next two photos show book marks crated with stamps 
from 2 different Carabelle Studio stamp sets.
Copic markers were used to color the images.
Both were fun...whimsical images to create with and color.

This is the 2nd stamped and colored Carabelle Studio image


For the next book marks...
I dug out a Tim Holtz stamp set that I have had for approximately 10 years...
(maybe more!)

I like the quote that is part of this stamp set
Here's a close up..

The book marks in the following photos 
were created before the holidays with an assortment of stamps
Some were created with in only...
some are Copic colored...
and the flowered set of 5 book marks were colored with water color pencils.


I enjoyed getting back to creating with this book mark project...
and am now ready to dive back into my much loved card making!
YAY!!
I've missed card making...
a lot!

Tomorrow I'll deliver the book marks to the shop that requested them...
along with 3 dozen cards!

And hopefully...tomorrow evening...
I'll be back in my studio...
making cards!

Thanks for visiting today!
Wishing you a wonderful day!
Michelle.