Wednesday, November 30, 2016

It's Wednesday ~ Crafter's Companion Inspiration Design Team Day!

Some images shout WATER COLOR!
Country Christmas...a stamp set  
from the Sheena A Little Bit Festive Collection 
is one of those stamp sets.

I stamped the image onto Crafter's Companion Watercolor Card Stock
with Stazon on Black Ink.
Then...I colored the image with Spectrum Aqua markers.
When the image was complete, I used Black Pearl Shimmering Card Stock for the mat layer.
I created the sentiment piece the same way...
(* sentiment is not part of this stamp set)
I Stamped...cut..matted...and added some water coloring to the sentiment background.
I positioned and placed the main image piece and the sentiment piece with foam dimensionals.
The base card is a White Pearl A2 pre-cored card.


and a close-up....
I added a touch of Clear Sparkle marker
to the snowy areas on the roof and stone wall
to complete the card and add a little bit or sparkly shimmer.

When I was in college...I lived and studied in Austria...
and travelled to many of the surrounding countries...
This little cottage brings a smile...
because it reminds me of many of the Alpine cottages
that were part of the beautiful town where I lived...
as well as other towns that I visited.


Thanks for visiting ...
I hope that this card has inspired you to pick up your paint brushes...
to create a water colored card of your own.
Have a wonderful day, my crafty friends...
Michelle

Supplies:
Coloring: Spectrum Aqua Markers ~ Moss, Topaz, Evergreen, Bud Green, Slate, Gold, Fawn
Chocolate, Desert, Jasmin, Tan, Yellow, Marigold 
Misc: Trimmer, scissors , asst adhesives, Ink pad, asst water color paint brushes, water receptacle


Tuesday, November 29, 2016

A Snowman Returns

A few weeks ago, 
I created a card with a wonderful COUNTRY SNOWMAN stamp from Stampendous.
I had decided, then,  that this adorable snowman was my favorite snowman this year.

So...
this weekend, when I was asked to make some Winter/Holiday/Christmas themed cards
I immediately reached for this snowman stamp...again.
I used Spectrum Noir Alcohol Markers to add color to the image.
The background color was added with Clarity Stencil Brushes and an ink pad.
(I used the mini scalloped rectangle die as a stencil when adding the brushed on background.)


I kept the card sketch the same...
used an assortment of prints for matting...
most of which came from the Crafter's Companion Traditional Christmas Paper Pad.
I used a scalloped metallic mat layer behind the main image
The sentiments are from an assortment of stamp sets.

I've got 3 cards to share with you...
As I mentioned, the sketches are the same...
The differences between each are the prints and the sentiments. 

The hounds tooth print caught my eye 
and so I used it as the largest mat layer on this card.

The biggest challenge when creating this little stack of cards
was finding narrow sentiments that would fit along the side of the card.
A few Concord and 9th stamp sets had sentiments that worked well on these cards. 
I stamped all of the sentiments with Gina K's Charcoal Brown ink.
(A new fave of mine...it's a beautiful brown!)


The mat layers on this card have snowflakes in muted colors on them...
(Wish you could see them better in this photo)


The nice crisp lines around the blue background inking
as created by using the scalloped die as a stencil, when brushing on the blue ink.
See? Dies are not just for die cutting!


I Like the holly print on this print...
You can also see the shimmer on the metallic card stock in this photo.


and one last photo of the 3rd card...
I'm happy with how the colors used on the snowman work well with the prints that I chose...
and I like that they're not the traditional Holiday colors..


It was nice to create a few cards with this snowman again.
and...
I have a feeling that he will be making another appearance next year.

Thanks for visiting!
Wishing you a wonderful and creative day!
Michelle.

Monday, November 28, 2016

Warmest Wishes

I (think) that I am finally able to say that I am feeling better!!
YAY!
After a month in bed...waiting to get over having pneumonia...
and watching tons of Hallmark Christmas movies
I am finally able to be up and about...
and am back to doing what I love!!

Card making!

Somehow...while I was sick..
November kind of happened...
and I was not a participant.

But now...December is almost here..
and I am so thankful for being able to join in on the fun.
I have so many new ...fun..and fantastic Wintry/Christmassy/Holiday-ish stamps and dies...
and now..
I am FINALLY able to enjoy them!

It wasn't easy choosing "which" stamp set to use first...
After going through the big stack of stamp sets that I have set aside on the studio work table...
I decided to create a few cards with Hero Arts COFFEE CUP TAGS.
(I almost always create in multiples...so I created 4 of this card)

I used my MISTI to stamp the cup with red ink.
By using the MISTI,  I was able to re-stamp multiple times to get great color coverage...
(no white or light spots)
I did the same for the holly leaves to get a good solid image.
The sentiment and snow flakes are stamps from other stamp sets (Concord and 9th)
The berries and cup edge were colored with Stampin Up markers.
The colors in this lovely print seemed to be a perfect match for Kraft Card stock..
so I cut a mini scalloped rectangle to sue as the background mat layer for the main image.
I matted the print on red card stock.
All of the components (the cup..whipped cream and holly sprigs) were die cut after being stamped
The cup was adhered with ATG adhesive.
The whipped cream and holly leaves were placed using foam dimensionals.
I added some shimmer to the whipped cream with a Clear Wink of Stella marker.
The Kraft layer was also secured with foam dimensionals.
Yes!...There's lots of dimension on this card!


I picked this beautiful print paper up last month 
at a wonderful local stamp and scrap shop
called Scrap-a-Latte
One of the owners, Renee, has an eye for beautiful paper
so I am always able to find lots of great 12 x 12 paper 
and some beautiful 6x6 paper pads when I visit the shop.
I was so happy to finally use this paper!


So now...
I THINK that I am "back"
I am taking it slow...
because fatigue is still an issue for me...
But I am THRILLED about being able to spend a few hours in my studio!
I've missed creating cards SO much.

Thanks for visiting today...
Wishing you a great Monday, my crafty and create friends!
Michelle
PS...Thanks a BIG bunch to everyone who has sent emails 
and/or private messages on FB during this past month..
asking how I am...
and sending good wishes and prayers.
Your kindness brings a smile...and gratitude.
Thank YOU!

Sunday, November 27, 2016

Take Me Out to the Ballgame...an Oldie but Goodie

Some stamp sets never go out of style.
and...
Stampin Up's Take Me Out to the ballgame
is one of those stamps sets!

I LOVE LOVE LOVE this stamp set.


My sweetheart, Gary needed a baseball themed card...
I knew that I wanted to use the Take Me Out to the Ballgame stamp set...
It was difficult, though...choosing which image from the set I wanted to use on the card.
(I love all of the images...choosing one wasn't easy)

I wound up choosing the largest image...
and whipped up a card for him.
He had no idea as to which stamp set I was going to use
(I wanted to surprise him)
When I presented the completed card to him...he LOVED the image
and he loved that card as well.

I kept it CAS (Clean and Simple
Background  color was added with Clarity Stencil Brushes.
Some color was added to  the image with Markers.
I double matted the colored image layer
using bronze and black metallic card stock mats.

As you can see...
Clarity Stencil Brushes have come my go-to tools for adding background color.
For me...they're foolproof...
The best thing is...
I no longer need or use daubers or sponges .
and that's a GREAT thing
being that I was never good at using daubers of any size.
and...I'm not much better with a sponge.
Saying adios to my daubers and sponges was a happy day for me
thanks to Clarity Stencil Brushes.

I enjoyed create this card for Gary.
He sent it to a friend...
and the friend loved receiving it...
as much as I loved creating it !

I hope that you enjoyed seeing a card make with this "vintage" Stampin Up stamp set.
I cherish having this set...
and anticipate that I will get may more years of use out of it
because I truly love each of the images included with this stamp set.

Thanks for visiting, my crafty and creative friends.
Have a wonderful day!
Michelle.

Wednesday, November 23, 2016

It's Wednesday! ~ Crafter's Companion Inspiration Design Team Project Day!

I just love the Sheena A Taste of India "Henna" stamp!
The design is beautiful...
and it shouts..."Color me!!"

I wanted to try 2 different looks for this stamp...
So..
I stamped the first with Versamark ink 
and then heat embossed it with gold embossing powder.
I stamped the other with Memento Tuxedo Black Ink.....no embossing.
Both were stamped onto Spectrum Noir Ultra Smooth Card Stock

I colored both images with Spectrum Noir (Alcohol) Markers...
using the same colors on both...

I thought that when the cards were complete...
that I'd be able to choose a favorite...
BUT...
that didn't happen...
because I really like both of them....a lot!
But I'll let you take a peek...
and decide for yourself ...

Here's the gold embossed version....
After coloring the image...
I double matted it with shimmering card stock onto a white base card.
The circle sentiments are created with two small stamps...punched out with circle punches...
the edges were outlined with a gold paint pen.


and a close up...


The second version...
the black ink image was colored with the same marker colors...
single matted with black pearl  shimmering card stock...
and mounted on a shimmering card stock base card.
The sentiment pieces were create the same way as the gold card..
and were edges with black ink...to match the image outline.


and....a close up.


I enjoyed creating both versions of this card...
and..
I really like both of them...
which means that I still can't choose a favorite...
Can you?

Thanks for visiting, my crafty and creative friends...
Wishing you a wonderful day!
Michelle.

SUPPLIES:
Stamps:Sheena A Taste of India EZMount Stamp Set - Henna and misc sentiment stamps
Coloring: Spectrum Noir Alcohol markers: BP3, BP5, BP6, OR1, LY2, LG3, CG3, CG4
Misc: Gold Embossing Powder, Memento Tuxedo Black Ink Pad, Versamark Ink pad,  Gold Embossing Powder, Krylon Gold Paint Pen, Circle punches


Monday, November 21, 2016

A Trip Around the World

Well, I am still in the recovery mode....
Resting, as per doctors orders...
waiting to get over having pneumonia.

It has been weeks since I last created a card
or have been able to spend some time in my studio.
 I am missing my creative time ...a lot.

The result:
My blog has been quiet.
Without creating...
I've had nothing to share.

But this morning, I realized that before getting sick
I had created a few cards
and had photos stored on my phone!!
(Note: The photos aren't the best...but they're decent enough to share)

So...
I DO have something to share, after all!

Penny Black has a series of single stamps
that have images of popular cities.
I decided to create a note card set
using each of the 5 stamps that I had.
and..
I wanted to use the same color palette on each of the 5 cards.
(I love the simplicity and cohesiveness created by using the same colors across all 5 cards)
I colored each of the cards with Spectrum Noir (Alcohol) markers
Each of the cards got a light brush of color
by using Clarity Stencil brushes and ink pads.

Each of the images were  double matted...
First with a narrow green mat..
and then matted again...with black.
The base cards are white.

So, now it's time to pack your bags...
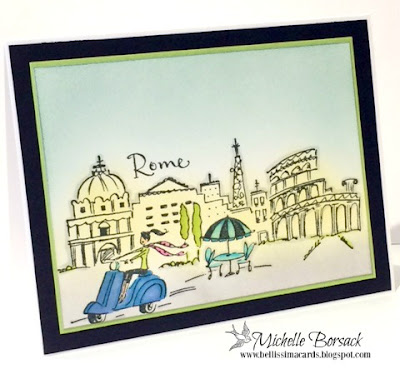
We are about to take a trip to Rome, Paris, New York, London and San Francisco
complements of Penny Black!


You can see the color palette, here...
in the first card
Yellow...blue...pink...green


I love this series of stamps..
The images are the perfect size for an A2 Card
and they have lots of nice detail.


Next up...
My home city....
New York.
(More specifically...I'm really Staten Island girl...and Staten Island is part of NYC)

Color was added to the sky...ground...and the buildings
with the Clarity brushes and ink pads.


Next stop...
Paris!
See the double matting?

There are so many nice details in this image, too.
(They ALL have nice details, actually)


Next....
Rome!
(Where a little piece of my heart will always be)
*Can you spot to "oops" on this card?
 If you were thinking that the "oops" is the scooter...
You're right!
I got a phone call while coloring the first Rome image...
wasn't paying attention...
and picked up a random blue marker...instead of the yellow marker
started to color...
and realized that I was using the wrong color.
(Next time...the scooter  will be yellow)

Next Stop....San Francisco!
San Francisco has the addition of one more color....
for the Bridge..
it just didn't seem "right" to not add a bit of a terracotta color to the Golden Gate Bridge 


I think that adding the color to the bridge was the right way to go.
What do you think?


I'm so happy to have some cards to share with you.
I have missed my card making time tremendously...
so it felt good to find some card photos on my phone
that I can share here, at my blog.

I hope that you enjoyed this little world tour...
Thanks to Penny Black!
Have a great day my crafty and creative friends!

Thanks for stopping by today...
and for not forgetting about me while I am in bed...watching LOTS of Hallmark Christmas movies...
and waiting to get over pneumonia.
Michelle


Wednesday, November 16, 2016

It's Wednesday! ~ Crafter's Companion Inspiration Design Team Project day!

It's aways great to find some great stamps and card making goodies 
that are ideal for "guy-cards"...
and...I'm thrilled that 
Crafter's Companion's Just for Men Collection has LOTS of those goodies!

Today... I chose to create a card using

Sara's Signature Collection Just For Men 6" x 6" Paper Pad - Urban Collection

Sara's Signature Collection Just For Men Clear Stamp Set - Street Wise

Sara's Signature Collection Just For Men Clear Stamp Set - Urban Graffiti

and.... Sara's Signature Collection Just For Men Clear Stamp Set - Rock Star


I chose this stamp set because it has a "young" look to it...
"Young" guy-cards always seem like a challenge to create..
But with this stamp set and image...
that challenge wasn't an issue.
I chose the background print
and then chose the print that I wanted to use for staling the image.
I made sure to NOT choose a dark print..
because I wanted the silhouette image to show nicely
I stamped the image....
and then positioned and adhered the image layer to the green print layer.
Then I stamped the graffiti "splatters" so that they would be stamped on bother prints.
I stamped the sentiment on a small piece of the brick print...
trimmed and matted it.
I used Ultra Smooth Card Stock to cut and score a card.
I then put the card together...as shown.
The sentiment piece was positioned using foam dimensionals.


Here's another view ....
You can see the positioning of the graffiti splatters...extending over both prints.

The Just for Men Collection is terrific for creating guy cards...
and the supplies that I used to create this card...
will be my go-to supplies in the future when I need a card...
for a guy!

Thanks for visiting...
have a wonderful and creative day!
Michelle.

Supplies:
Misc: Trimmer...ink pad...asst adhesives.

Wednesday, November 9, 2016

It's Wednesday! ~ Crafter's Companion Inspiration Design Team Project Day

Wednesday's are rolling mourned quickly...
I can hardly believe that it's tie to share another 
of my Crafter's Companion Inspiration Design Team Projects!

Today we're taking a trip to Provence
with Sheena's A Little Bit Scenic ~ Provence stamp set!

I stamped the image and colored it with Spectrum Noir ColourBlend Pencils.
and..
for something different...
I cut a piece of vellum paper, to the correct size and stamped the sentiment...
"Thinking of You" from the Sara Signature Collection Love and Romance Hello Beautiful stamp set.
I then placed sheer vellum paper over the image to create a shadow box effect.
(This is actually like a shaker card...without all of the little beads, sequins and  "shakeables" inside.
I created a frame with brown woodgrain card stock 
and...positioned it with foam dimensionals.
I placed black card stock behind the image piece...
then mounted it on a white base card.
Then..
I colored a few of the flower pots that are part of the main image 
and cut them out to use as embellishments...in front of the vellum.
*When coloring, I made sure to build the colors up 
so that they would show nicely through the vellum.


Here' a close up...
I'd love to be back in Provence right now...
sitting at that little table.


Thanks for visiting!
Have a wonderfully creative day!
Michelle

Supplies:
Brown Woodgrain Card Stock and Vellum Paper
Coloring: Spectrum Noir ColourBlend Pencils:  005, 007, 016, 018, 022, 024, 025, 030, 032, 036, 038, 041, 050, 058, 079, 084, 085, 087, 100, 104, 112, 114, 115
Misc: Trimmer...adhesives, fine detail scissors, Memento Back Tuxedo Ink pad

Friday, November 4, 2016

Peace, Love, Joy and Fresh Cut Poinsettias

I'm excited to share today's card with you
because it was created with two fantastic new-to-me stamp set
from The Ton Stamps.

For this card...I used 2 stamp sets form my new Ton order.......
and a sentiment from another set. 
(Sorry...I can't remember who makes the sentiment stamp) 

The background was created with the HOLIDAY BORDER stamp.
I stamped a small section of the same stamp onto part of the sentiment piece.
The scalloped sentiment mat is shimmery chocolate brown metallic card stock.
The poinsettia was created with the FRESH CUT POINSETTIA layering stamp set
and coordinating dies. 
I used an assortment of Altenew and Stampin Up ink pads for all of the stamping.


and...
here's a close-up...
I added a little bit of sparkle to the poinsettia center 
with a clear Spectrum Noir Sparkle Marker


I am so thrilled with ALL of the new stamps in the order from The Ton Stamps...
and am happy that I combined this large border stamp..
and the poinsettia stamp set....to create this card.

If you're loving this poinsettia..as much as I do....
take a peek at the water colored card that I created and shared here at my blog last week
using the Fresh Cut Poinsettia Outline stamp set...
You can see the water colored poinsettia outline card HERE

Thanks for visiting....
wishing you a wonderful day!
Michelle

Thursday, November 3, 2016

In the Garden...with a Friend

I am a Penny Black lover...
and have a nice collection of her stamps.
Part of the fun of having a nice large collection of designs that you love...
is having the opportunity to browse through them..
and pick one that catches your eye.

This time...
Penny Black's GARDEN ASSISTANT caught my eye.
and so...
I HAD to create a card with this wonderful image!

I added color to the stamped image with Spectrum Noir Alcohol Markers
then created background color with Clarity Stencil Brushes and ink pads
And...
as I usually do...
I kept the card very CAS (Clean And Simple)... 
with two mat layers whose colors complemented the image colors.


So what do you think?
Aren't they Cute?
I Love their matching  "outfits"
and I'm happy with having kept the color palette simple...
by using only a few colors.

Thanks for visiting, my crafty friends!
Have a great day!
Michelle.

Wednesday, November 2, 2016

It's Wednesday! ~ Crafter's Companion Inspiration Design Team Project Day!

I'm always happy when I come across a  "cute image" ...
and as luck would have it...Crafter's Companion has lots of great stamps...
many of which qualify as being....cute!

I'm always trying to build up my "stash" of kid-friendly cards...which is in desperate need of some little boy/little girl cards...
and this Mulberry Wood "SWEET LOVE" rubber stamp set
seemed like the perfect stamp set for a sweet kid-friendly card.

I stamped the image with Memento Tuxedo Black ink...
onto Spectrum Noir Ultra Smooth Card Stock
(I also used this card stock to cut and score a card base)
I colored the image with an assortment of Spectrum Noir (Alcohol) Markers
and matted the completed image on Shimmering Card Stock.
I wanted to create a hand cut sentiment banner...and I also wanted to mat the banner.
I chose a small section of a sheet of print paper from the Love & Romance paper pad
and used it as the sentiment.
I positioned and attached the matted banner with foam dimensionals.

Here's a look at the finished card...

I think that this sweet little card is ideal for a little girl's birthday...
or Valentine's Day!
The image is adorable...
and provides lots of creative opportunity for lots of detailed coloring.
The Spectrum marker colors that I chose to use were perfect for this card, I think.


Here's a close-up of the 2 layer sentiment banner that I hand cut.
You can also see the Spectrum color blending and shading, in this close-up.


I set out to create a card that was kid-friendly...
and I think that I accomplished that...
Thanks to the Mulberry Wood SWEET LOVE stamp set.

Thank for visiting...
wishing you  wonderfully creative day!
Michelle.

Supply List:
                              Shimmering Cardstock - Candy Red
                              Sara Signature Collection Love & Romance - 6x6 Paper Pad
Coloring: Spectrum Noir Alcohol Markers PP1, PP3, PP5, BP2, BP6, EB2, TN3, TN5, LV1, LV2, IG1, DR3, CG1, CG2
Other: Trimmer, Scissors, asst adhesives, ink pad

Tuesday, November 1, 2016

Congratulations....Mr. & Mr.

Have you ever looked at a stamp set...
and in a millisecond...
knew exactly what you wanted to create with that set?

"Plus One"...from The Ton Stamps...
was that kind of stamp set for me.
I knew EXACTLY what I wanted to create.
The card existed in my mind...
and now...I finally had the right stamp set..and sentiment set...
to create the card that I imagined.

I put The Ton's Plus One stamp set together with a sentiment set from Woodware...
I used Spectrum Noir (Alcohol) Markers to color the images
and added some background color with Clarity Stencil Brushes and ink pad.
The "Congrats" was one of many stamps in a generic stamp set that I have in my studio
(from Stampin Up, I think) 
and the "Mr & Mr" is one of the stamps 
that are part of a Woodware stamp set called
Civil Partnership/Mr & Mr
The image layer is double matted...
first with black matte card stock...
and then again with dark blue metallic card stock.
(Very sharp and striking looking with the blue suits on the images)


I am really happy with this card...
The images are fantastic...
and are perfect for creating this card...
A card that I have wanted to create for a while..
but just couldn't find the right images or sentiment for....
Until NOW!


This being said...
stay tuned...
one day soon I will be creating a Mrs & Mrs card as well
(Yes!..I already have the main images...and the sentiment set...on standby...)

Thanks for visiting, my crafty and creative friends..
have  wonderful day!
Michelle.