After he left for work today I raced through my housework and other housewify-things...and spent some time in the Studio making his birthday card.
Oh, I should tell you that while card making is my passion, baseball and the New York Mets is Gary's passion. He is the host of Mets Musings (a baseball podcast) and co-hosts another baseball talk show (MLB This Week) as well. He is a lover of all things baseball and is a lifelong Mets fan. (His recording studio is actually a studio that is built within my studio...which is really nice because we both enjoy what we love and most days we both head out to our Studios where we can be together...yet we are doing out own thing.)
So anyway, back to Gary's birthday card.
I have a new Crafter's Companion die that I planned on using for his card. (I am on a die cutting kick right now, as opposed to straight up stamping and coloring etc, as I'm sure you can tell, based on my recent blog posts!)
The die that I wanted to use for his card is very intricate (not frilly-froo-froo or girly...just intricate).
I had to run it back and forth through the Big Shot 11...12 times to get it to cut completely.
I learned this by trial and error yesterday when I did a trial run.
4 Passes didn't work...6? no good...8? almost...10 passes?..pretty good...almost...
Finally..back and forth through the Big Shot 11...12 times worked well...so that's what I stuck with.
In the end, I was happy with the card and so I sent a photo via a text to my crafty-bestie, Debbie, to get her opinion.
This is the photo that I sent her...
One pic to show the card...and another of the card lying down...taken in hopes of capturing the shimmer on the card stock
Here's the (first) card...yes...you heard me..the FIRST card
I WISH that the beautiful shimmer on this LCI METALLIC CARD STOCK showed up better in the photos...its so beautiful...and the weight of the card stock is amazing...


She loved it.
gave me a BIG thumbs up.....
But....then she said...."how about doing the orange shimmer with blue shimmer card stock...being that Gary is a Mets fan"
(She knows what's in my insane stash as well as she knows her own insane stash.....haha)
That was a light bulb moment for me!
I was thrilled with Debbie's (ingenious) idea!
(Only another woman married to another over the top Mets fan would think of this!.....I have to say...that Debbie is on the ball!)
So, I went to work on the blue and orange card.
And then I had my own light bulb moment (I get full credit for this one...sorry Debbie)
Why not do a photo tutorial...for those of you who are "afraid" of intricate dies..frustrated by them..and shy away from them.
So...here it is...
A step-by-step photo tutorial of today's card...Gary's very Metsy birthday card!
Here we go...(I promise...after this tutorial you will no longer be afraid of lacy intricate detailed dies....I promise!)
First, though, you've got to make a trip into the kitchen...grab your box of waxed paper....bring it into your craft room or to your workspace and leave it there...it will be a necessity whenever you work with scary detailed intricate dies.
NOTE: from now on, your grocery store list will include 2 boxes of waxed paper...one for the kitchen and one for your crafty adventures)
Now that you've got the waxed paper...you're ready to roll....
Ready?
We've got waxed paper and the scary but lovely die
(detailed and intricate...don't say that I didn't prepare you!)
Aren't all of those holes and dots and minuscule stars and swirls etc scarrrry?

Here's a close up of the Scary but Lovely die
just in case you weren't frightened enough with the photo above.
Scarrrrry....I know....I know.
But remember, I promised that by the time we get to the last photo in this tutorial,
you will no longer be frightened.
You will actually feel confident enough to take on any intricate die.
ANY!... ALL!!
You'll be thinking..."Bring 'em on!"
The more intricate and detailed...the better!
and...After this tutorial...
Even if you were to be locked in a room with an intricate detailed die..you would not break a sweat...
I guarantee that....
(Can you tell that I was once a motivational speaker?)

Okay...enough of my comedy act...
let's get down to business.
Gather up all of the "stuff" that you'll need:
Big Shot, Magnetic Platform, Precision Die Cutting Plate,
Standard Cutting Plates, Card Stock, the Scary but Lovely die,
easy to remove tape (I used Micro paper Tape/surgical paper tape)
and I am using my much loved LCI Metallic card stock...
and I am using my much loved LCI Metallic card stock...

Now here we go...
Ready?
Let's get set up
Place your magnetic (or multipurpose platform) on the Big Shot
My Precision plate is already knicked up and well loved.
After just a few uses, I knew that I could not live without it.
I have already ordered a back-up..."just in case"
Okay...place the card stock onto the precision plate
and use a small little piece of paper tape (or removable tape etc) to hold it in place
(Note: my shimmery card stock is the same on both sides....
but if you are using paper that has a specific side/pattern that is the "right side"..
make sure that the "right side" is facing up)

Next..place a piece of waxed paper over the card stock

An now.....place the scary but lovely die on top of the waxed paper
with the cutting/blade side down
Use a few small pieces of tape to hold it in place.

Place your cutting mat over the scary but lovely die

I needed a shim
Not a thick one
(You might not need one...every machine is different)
This time I just needed one layer of card stock as the appropriate shim
(That's my beloved and coveted Neenah card stock recklessly torn and being used as the shim)
When will I ever learn to reach for the "cheap stuff" when I need a shim
I am so out of control with the card stock thing..
I even write shopping lists and write down info from phone messages on Neenah.
Someone slap me back to my senses and help me to stop the card stock madness.

Okay...The shim is in place
But lets do a little re-cap...
Underneath the shim..this is what you should have...
Here's the stack...in order of appearance....From the bottom up:
Magentic Platform (or multipurpose platform if that's what you have on hand)
Precision Cutting Plate (Black rubbery side facing up)
Card Stock ("right side" facing up)
Waxed Paper
Scary but lovely die (Blade side facing down)
Standard cutting plate
(and in my case...the shim,which is not shown here..so that you can see everything else in the lineup)

(if you're a using a Cuttlebug, you'll stack everything just like you do when you cut a wafer thin/metal die which is (from the bottom up)
A plate...B plate...card stock..waxed paper...die...C plate
Okay...so now....place the entire stack onto your Big Shot

And start cranking
and cranking
and cranking
and cranking
in my case...11...12 times....back and forth...
(make sure to NOT let the stack exit the machine at ether end..if you do..it can shift everything ...and you will then make a trip to the trash can with a messed up sorry looking die cut)
still cranking.....
11....12....
DONE!
Want me to flex my muscles on my right arm?
They're very impressive...thanks to the scary but lovely very intricate and detailed die
Okay..12 passes and we are ready for...the reveal!
You should be feeling A LOT less scared and anxious about detailed intricate dies by now
How do you feel?
Want to tell me about it?
How has this experience made you feel so far?
(Can you tell that not only was I a motivational speaker, but I am also a psychiatric social worker?)
Tell me how this experience has made you feel, so far
I promise...there will not be a co-payment...
Let's just chat...
crafter to crafter...
this session is gratis
No Co-pay

Okay now...
this is the exciting part
Exciting ONLY because you are following the directions...
the waxed paper ...the shim thing....cranking a gazillion times...
Without all of those little tricks of the trade....you might still be feeling scare and frustrated
Stick with me....
You'll be a footloose and fancy free die cutting fool by the time we are through here.
Alrighty...
Here we go...
GENTLY start to peel back the card stock from the waxed paper...
I SAID GENTLY!
If you approach this with reckless abandon...your next stop will be the trash can
and you will have to crank crank crank another 11....12 times...
and then your cranking arm will start to look like the arms of Arnold Schwarzenegger that we all know and remember from the 80's
So..this being said...start peeling back the die from the waxed paper...GENTLY...
you heard me ARNOLD....G E N T L Y...gentttttly.

Very good....
Gently..
It's almost separated....
very good Arnold...
Don't worry about the waxed paper that is stuck in the die..or on the die cut card stock
We're going to take care of that ...next
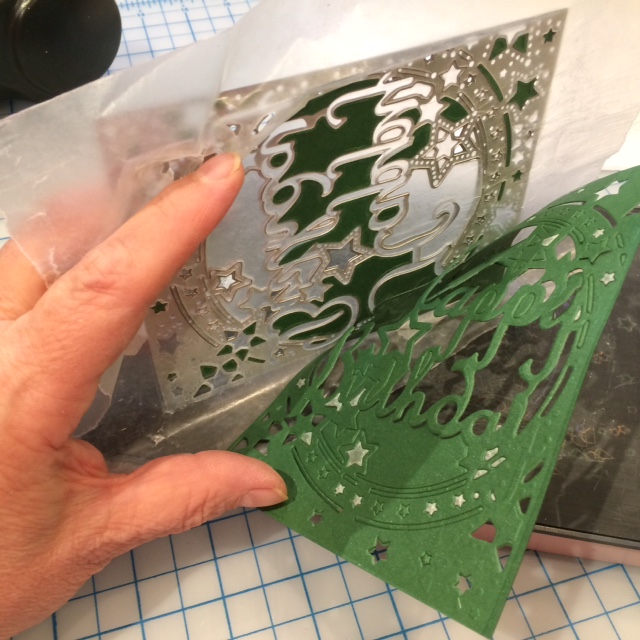
The front of the die cut card stock might look like this....
give or take a few hundred little shreds of waxed paper
...relatively speaking

The back of the die might look like this (on the left)
and the back of the die cut card stock might look like this (on the right)
Give or take a few hundred teen tiny dots and shreds and in this case....stars
By the way..I haven't asked since a few photos ago...
How are you feeling?
Less anxious?
Less scared?
Want to talk about it?
(Still....as promised...no co-pay....so chat away...
tell me everything...
well...maybe not EVERYTHING....after all...this is a card making tutorial)

Now it's time to get out your favorite poking tool....
(Or as I like to call it...my dentist tool)
(Did I tell you that before I grew up and became a psychiatric social worker that I worked for a dentist?
This little pointy tool..and the other 4 tools in the set ARE dentist tools..I'm telling you...believe me on this one...
Somewhere along the way a craft company decided to make them into crafting tools
This being said...please do not start using them for dental hygiene...
That would juts be W R O N G
Okay so let's get out of the dentist chair...and back to paper crafting...
Sit back and relax..and poke away...
Get every little dot..shred...star...every little do-dad that didn't fall off when you separated the card stock from the waxed paper
Pick and poke away...
get EVERY SINGLE ONE
Hold it up to the light a few times to make sure you've gottem' all.

Then get out your brush tool thingy.....and clean the die...
This little tool is pure genius

I have the Spellbinders Tool n One (blue) and the Sizzix tool (black)
They both do the job...fantastically
I personally prefer the Sizzix tool...
It just feels better in my hand because of the shape of the handle and it's little bit of a cushioned feel.
The brush is also a bit bigger than the other one.
I like that...it seems to work a bit better...
Look at that die!
All of those teeny tiny pieces that were stuck in the die are GONE!
It's a beautiful thing!

Although I used green card stock in the tutorial photos...
I actually created the die cut layer for Gary's birthday card with blue shimmer card stock
This is the finished card...
Blue and orange...
Official Mets colors!
The base card is LCI Metallic Card Stock (Mandarin)
and the die cut is LCI Metallic Card Stock (Curious Blueprint
The Die cut is popped up with Stampin Up Dimensionals
I used mini glue dots and Bling dots to attach the stars
(had to cut them to fit in the little nooks and crannies on the back of the die cut layer)
I stamped a birthday sentiment on the inside with Stazon on ink
and wha-la...
Gary's very Metsy birthday card was done!
(And he loved it!)


I tied to capture the amazing shimmer on this cards stock...
but...NONE of the photos really do it justice..
It is absolutely beautiful...
I have many of the Metallic cards stock colors and one is more beautiful than the other
Maybe if you click on the photo for a larger view... the shimmer will show better
Any luck?

So...now let's chat
How are you feeling?
Less frightened of detailed intricate dies?
I sure hope so!
And best of all....in the end
You've got better muscle tone on your cranking arm...
You'll be making knock your socks off gorgeous die cut cards now!!
The manufacturers of waxed paper will be grateful that you will now be purchasing multiple rolls of waxed paper regularly.
and
above all
NO Co-pay...for any of this!
Thanks a bunch for visiting my blog...and for putting up with my wacky sense of humor....and for checking out the photo tutorial...
While there wasn't a co-pay for services rendered....I'd love it if you'd leave a comment below.. and subscribe to the Bellissima Cards blog email list (upper right of this page)
Card making friends: the supply list is below
Card Loving friends: This card will be available for purchase, soon, in assorted colors... at my etsy shop.
Michelle
Supply list:
Die: Crafters Companion Create-a-Card A2 Die ~ "Birthday Star"
Card Stock: LCI Curious Metallic (curious Mandarin, Curious Botanic, Curious Blueprint, Curious Super Gold)
Tools: Big Shot, Magnetic Platform, Precision Cutting Plate, Std Cutting Plate
Misc: Waxed Paper, Poking Tools, Micro Paper Tape, Spellbinders Tool n One and Sizzix Die Brush Tool, Trimmer, Stampin Up Dimensionals, Mini Glue Dots, Bling Dots
No comments:
Post a Comment
Thank you for taking a moment to comment!