Pages

Tuesday, January 31, 2017

4 Tiny Images......4 Big Wishes

I'm still working my way through my stack of 100 stamped and  colored images...
and I am having SO MUCH FUN!

I almost always create cards in multiples...
so having multiples of an image...stamped..colored..and ready to roll
is right up my alley!

Today I've got 4 cards to share...
similar...yet different...
Each with the same tiny little image from Close To My Heart's What a Great Day stamp set.
The images were colored with alcohol ink markers...
and I put them together with an assortment of sentiments that pack a big love-filled punch.

First up...
A birthday card .....with a little extra happiness message.
The bottom most layer of teal card stock is embossed with tiny dots...
a nice complement to the dotted pink print paper.

The sentiments are a combination of PTI (Keep it Simple: Happy Birthday II)
and 
WPlus9 (Wishing You)


For the second card..
I used the same print...in 2 colors...
For some reason..the photos of this particular card are not very sharp....sorry about that)

The sentient for this card is by Stampendous (Angel Wing Quotes)


On the third and fourth cards I used a little bit of ribbon.
Don't fall off of your chair!
Yes!
I USED RIBBON!
This is one for the record books.
Not only did I use ribbon once...
I used it twice!!
Get out the smelling salts...
This is a faint-worthy event!

Are you ready to see something that you may not ever see again?
(Or at best...something that you may not see again for a very very longggggg time!)
Here we go...

Card #3...
A simple birthday sentiment (from the same PTI stamp set noted above)
and an added sentiment below (from the WPLus9 set noted above)

I chose bronze metallic card stock for the bottom most mat layer..
(It's gorgeous)
The orange dotted print is a nice complement to the image colors, I think.
and...
then there's the ribbon.
A length of ribbon horizontally across the card..under the image...
and a small neat and tidy bow on the right.


and..
one last card...
and a little more ribbon!
Each of the images on the 4 cards that I've shared today were positioned using fun foam...cut to size.
The added dimension is nice on each of the cards...


The sentiment on this card is from a friends stamp company (which is no longer in business)
I cherish all of the sentiment stamps that I have from her company...
The quotes are wonderful..
and the sentiments are all beautiful...
This is one of my favorites...and I have used it countless times over the years.


So, once again..after sharing a few cards with you...
I can end a blog post by saying...
I am thoroughly enjoying creating cards with the 100 images that I have stamped and colored
during a weeks time.
I am having so much fun!...
and...the extra nice bonus is....my almost nil stash of cards is beginning to fill in nicely!

Thanks for visiting my crafty friends!
Wishing you a wonderful day...
sprinkled with a little bit of time that allows you to create something 
that fills your creative heart with happiness!
Michelle.


Monday, January 30, 2017

Hedgehogs.....NOT Porcupines....

I MUST begin this blog post today by correcting yesterday's error...
I have been given an impromptu lesson in critter identification...
and I now know that the cuties that I shared yesterday
and the cuties that I am sharing today are....
HEDGEHOGS
NOT PORCUPINES!

So....without further ado...
I would like to share a few more HEDGEHOG cards with you today!

I have been working my way through my big stack of 100 colored and stamped images..
and have been having a blast the last few days creating cards.
I am still needing Birthday cards for my stash....
so...
I created 3 birthday cards last night...
They're similar...yet different.
The images are from an "oldie but goodie"stamp set....Stampin Up's Hedgehog Happiness. 
I used an assortment of sentiments from PTI (Papertrey Ink) and Lawn Fawn


This is the first card that I created....
The 2 sentiments used to create this sentiment banner are from Lawn Fawn's Sophie's Sentiments set.
I like the font..it looks very much like it was hand written...


I have always loved the combination of a dotted print and a floral print..
As I usually do....I hand cut the sentiment banner...and then matted it....to give it a nice finished look.


For the second hedgehog card 
I chose to use a sentiment by Paper Trey Ink called Keep it Simple: Birthday II
I also added some floral banner pieces of varied lengths to the bottom of the sentiment banner...
Again...florals and dots...a longtime favorite of mine...


You can see the lift beneath the image layer, very nicely in this photo.
(As usual...I used fun foam...cut down to size...behind the image layers..
for a nice sturdy, yet lightweight,  lift/added dimension)


The final hedgehog card..(well...maybe I should say...final....FOR NOW..)
is this back dotted  and floral version....
I love the crispness of the black and white...
and the contrasting pop of color that the flowers bring to this card.
I chose a bright pink metallic card stock for matting the image layer...
(love the pop of color there too!) 

The sentiment on this card was also from the same PTI stamp sent...
This time..I chose to use a Stampin Up punch to create the 3 little floral banners
instead of hand cutting them myself.

I've enjoyed creating hedgehog cards these last few days...
(Yes...HEDGEHOGS....NOT PORCUPINES!...I've got it right now...I am a critter expert!))
This Hedgehog Happiness set hasn't seen ink in a long long time...
It was fun to take it out...and use it again...

I'm not sure which image(s) I'll work on next...
I've got lots of options...
So..I'll flip through my stack of colored and stamped images
and will choose whatever catches my eye at that moment...
For now, though..I am thrilled to add a few more birthday cards to my card stash!

Have a wonderful day, my crafty and creative friends!
I hope that you find a little bit of time to create something wonderful today!
Michelle.

Sunday, January 29, 2017

Porcupine Love and Happiness

In my stash of 100 newly stamped and colored images...
there are 6 adorable images of two love filled porcupines. 
I decided to create 3 "Love" themed card with the porcupines
and
3 Happy Birthday cards with the remaining three.

I've got the "Love" cards to share with you today.
Look at these 2!
Aren't they adorable?

The porcupines are from a past Stampin UP Hostess set...
Coloring was done with Spectrum Noir Alcohol Markers.
The banner was created with Stampin Up's Thoughtful Banner stamp set 
and the coordinating banner punch.
The "Happiness" sentiment below the banner is from Stampin Up's Jar of Love stamp set.
The print background paper is one of Doodlebug Designs Valentine Collection prints.
The mat layers are bright pink metallic card stock
and
dark teal matte card stock
I used foam dimensionals to position the image layer and banner.

I created 3 of this card as part of my "card stash replenishing
and think that they're perfect for Valentine's Day..
or....
 any day when you'd like to met someone know that you Love them.


I'll be back tomorrow with the other 3 porcupine birthday cards.

Have a wonderful day, my crafty friends
and thanks for visiting!
Michelle

Saturday, January 28, 2017

Ballerina Silhouette

My card "stash" was almost depleted as the new year rolled in...
and so I've been focusing on replenishing it.

To give myself a nice kick start
I decided to spend one week coloring....and stamping.
That's all.
Just coloring ans stamping....No card making.

In exactly one week...
Friday to Friday
I stamped and colored this stack of images.
Exactly 100 images!
Yep...100!
and now...
I am finally ready to create some cards!


I Chose this Ballerina silhouette image as the first image to create a card with.
I had stamped and die cut 6 of this sweet image...
and  so...I created 6 of this card.

The mat layers were created with metallic card stock.
The image ("Twinkle Toes"...by Clearly Besotted)
was stamped multiple times using my MISTI...to get a good solid silhouette image.
I was very happy  with the density of the black ink after multiple stampings.....
and thought that in the photos...the ballerina kinda looks like a die cut...instead of a stamped image.
I used one of my favorite dies ...Mini Scallop...by MFT
The die cut image layer was positioned using foam for dimension.
I added a few crystal sequins for a little bit of sparkle.
The 6 cards will eventually have a sentiment stamped on the inside....
*If you look closely...you'll see that this tiny ballerina is smiling...
which makes this image extra sweet.


My favorite sequins....
 Pretty Pink Posh Sparkling Clear Sequins sequins...are perfect for this card I think.
(I love them lots...and just ordered some extras for my stash from


I think that I'm off to a good start with replenishing my card stash...
and I'm looking forward to working my way through that wonderful stack of 100 images...stamped..colored...
waiting for me...
and ready to be transformed into a  card!

I hope that you'll come back and visit again 
to follow along as I create 100 cards!

Thanks for visiting today...
Have a wonderful Saturday my crafty and creative friends!
Michelle.

Friday, January 20, 2017

It's Cupcake Time...Again!!

I've got  quickie blog post to share today...
Unplanned..
But I just HAD to share!

Last week I made a short stack of cards with the cupcake on the right...(blue cupcake paper liner)...
Then..last night...as I was putting the Catherine Scanlon Cupcake stamp away...
I was still feeling the love for this image...and HAD to make a few more cards...
This time I switched up the colors...and used a different stamp for the flower embellishment on the bottom
and..
I used different colors for the cupcake holder...flowers...and frosting...
and the stenciled dotted background.

The other day I shared photos of the blue cupcake paper holder card...(right)
Last night I made a few of the pink..(left)
I LOVE this stamped image
I couldn't resist the opportunity to make a few more 
before moving on with my Birthday card stash replenishing efforts.

Last night's new color palette card on the left....


Stamps: Catherine Scanlon Designs (HERE at Art Gone Wild)
Coloring: Spectrum Noir Alcohol Markers
Dotted background: Created with a Stencil..Clarity Stencil brushes...and ink pads

I've always enjoyed using one stamp...
and creating a few versions of a card with it.
THIS stamp was terrific for doing that.
and...
They're great additions to my Birthday card stash, I think.
As I type this...
I'm thinking that the next time I use the stamp..
I am going to go white an orange and yellow palette.

Have a great Friday, my crafty and creative friends..
Thanks for visiting!
Michelle 


Wednesday, January 18, 2017

Created with Love....A Card For a Friend

I've got 2 things to share with you today!
#1... A card
#2. Some nice news

First...
The card
One of my biggest joys when it comes to card making
is creating a card for someone that I love and care about....
and knowing that my little card might bring a smile...
and remind them that they are being thought of...
with love.

I won't tell you who I've created this card for...
because that person might check in here
and then...
the surprise wouldn't be a surprise! 

I can tell you that I created this card for a friend 
who is journeying through her cancer diagnosis and treatment.
With having 3 different cancers myself...
and having gone through multiple surgeries and treatment...
and being recipient of so much love...prayers...and support
from countless friends and family members...
I know how much it means to receive a card...or a phone call...
and above all...
prayers.

I created this card from my heart...
as a little reminder to my friend...
that she is amazing...
courageous
and that she is being thought of.

The stamp and sentiment are from the "You've Got This" Stampin UP stamp set...
I used Spectrum Noir (Alcohol) markers to color the image
and Clarity brushes and ink pads to add color to the background.
The narrow mat layer is a beautiful pink metallic
The sequins are Sparkling Clear Sequins by Pretty Pink Posh.
I get all of my Pretty Pink Posh sequins at my friend Justin's shop...
either when I visit the shop...
or at his Stamp, Ink, Paper on line shop
HERE
Stamp, Ink, Paper has a great selection of Pretty Pink Posh...
and lots of wonderful stamps and card making  goodies!
The shop is connected and shared with a scrapping shop called Scrap-a-Latte...
another gem...
filled with gorgeous paper and all things related to scrapbooking


Cards like this are very "me".
I love the simplicity of CAS (Clean And Simple) cards.
One of my goals for this new card making year
is to  be more mindful about choosing prints for backgrounds.
(I usually go with solid backgrounds)
To remind myself to choose prints more often...
I have left a few favorite paper pads on the studio worktable
as   a BIG "in my face" reminder.
So far...my plan is working!
and..
I am now using prints more often.
The Sparkling Clear sequins have become my faves
I just added another package to my order
when I shopped at the on line
Stamp, Ink, Paper shop last week!
( I am predicting a "hoarding" situation happening with me
 when it comes to these sequins.)

I stamped out a few more of this beautiful image
They're waiting for me on the studio worktable.
I'm thinking that I'd like to create a yellow flower ....
and maybe another pink...

Oh!...
I almost forgot!
The "other" thing that I wanted to share with you!

I am gearing up to start offering card making videos again?!!!

It's been a long time since I did tutorials
and now with our hurricane construction being 90% complete...
being settled in  to my studio for almost one year
and with me having a little break from cancer surgeries and treatment...
I feel ready to get back to videos.
I've got this on my agenda for the near future.
I think that you're going to love what I've got planned...
Don't forget to check in here at my blog often
so that you'll know when the videos are available!

Thanks for visiting, my crafty friends.
have a wonderful day...
and...
I hope that you find time today to create a card  for someone...
just to let them know that they are being thought of.
Michelle.

Monday, January 16, 2017

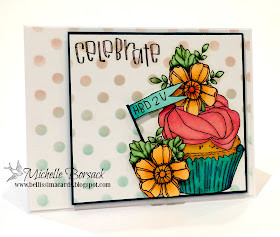
Happiness Overload with Catherine Scanlon's Cupcake Stamp Seet

I get giddy with card-making-happiness when I create a card with a Catherine Scanlon Designs stamp
and have the opportunity to share it with you here at my blog.

There are many (many many many) stamp designs and companies that I like..
and then... there's the next level up...
where the like becomes love.
The kind of stamp LOVE that makes you feel like forgetting about all of your adult responsibilities...
sneaking into your craft room or studio...
and doing nothing but making cards with THAT stamp.
.
I am just starting a Birthday card making binge...
I need to replenish my almost-empty birthday card stash...
for both my/our personal use...and for my ETSY shop.
and...
I knew that I wanted to start the Birthday card making with Catherine Scanlon's Cupcake stamp set.

I Colored the image with Spectrum Noir (Alcohol) Markers
and highlighted the "Celebrate" letters with strokes of color in the tiny opened areas
I created the dotted background print with a stencil...
Clarity brushes were used to lift color from ink pads...
and then to brush the ink over the stencil to create the dotted design.
I matted the image layer and positioned it with foam...to create some lift and dimension.
Then, I stamped the flower portion of the cupcake a second time 
Colored it...cut it out...and positioned it with foam dimensionals...
using it as an embellishment.
I also stamped the banner stamp from the stamp set...added the HB2U...
colored it...cut it out...
and positioned it with foam dimensions , as well.
The mat layer under the cupcake layer is a deep turquoise like color 
that almost matches the cupcake liner/paper.

Wanna see?
I go into maximum happy mode when I create a card with a Catherine Scanlon Stamp
and am always REALLY happy to share the finished card(s) here....with you


More Cupcake happiness...
I just LOVVVVE this image!


Of course,  I couldn't stop after creating just one cupcake card...
I did a few exactly like the one shown above...
I have a few more of this image stamped out...waiting to be colored.
I'll switch up the colors a bit...next time around.

If you're loving this image and Catherine Scanlon's "style"
you can see all of her stamp designs HERE .

As for me?
THIS was a great way for me to kick off my birthday card "stash" replenishing!
and...I'm looking forward to having some time to color the extra stamped out images
that are waiting for me on the studio worktable.

Thanks for visiting today...
and now...
it's time for you to visit Art Gone Wild
to create your Catherine Scanlon stamp wish list!
Have a great day my crafty and creative friends!
Michelle

Sunday, January 15, 2017

Yellow...for Remembrance

I've been busying trying to replenish my sympathy card stash...
and so I have one last sympathy card to share...
before moving on to Birthday card making.

I always seem to gravitate towards using purple and yellow florals for sympathy cards...
most likely because purple is the color for sadness & mourning
and yellow is the color for remembrance.

I have used this stamped floral image countless times before...
(Stampin Up~ You've Got This)
The image is the perfect size for a card front...
and..
I always enjoy coloring this image...
whether it be with pencils..alcohol markers...or water coloring 

For this card...I chose to color with Spectrum Noir (Alcohol) Markers.
The base mat is covered with a smaller layer of vellum...
The image layer is mated with ivory metallic card stock.
Background color was created with Clarity stencil brushes and ink pads
I hand cut a banner...brushed it with some color..
and added a stamped (Papertrey Ink) sentiment 


The soft light green print layer has a muted tapestry-like look
I chose to add a layer of vellum to soften the colors even more
The image layer was positioned with a piece of self adhesive foam...
and the sentient banner was positioned with small foam dimensionals...


I have a few more of this image stamped and waiting for me on the studio worktable...
I have a specific plan for one of them...
and will probably create birthday cards with the others.

Speaking of birthday cards...
That's the next part of my "stash" that I have to replenish.
It seems that no matter how many birthday cards I create...
I NEVER have enough on hand...or in my ETSY shop.
(Especially if they are guy-friendly birthday cards)

So I'll be moving on now to create some birthday cards...
and then I'll get back to Valentine cards...

As always...
Thanks for checking in...
I hope that you've gotten a little bit of inspiration by visiting my blog today...
Have a wonderful day, my crafty and creative friends...
Michelle.


Saturday, January 14, 2017

Sympathy cards...a Stencil...Artisan Bread..and a Laundry Confession.

I'm still working on replenishing my "stash" of Sympathy cards...
and created a few of this card to add to the collection
in two similar .....but different versions.

I used Stampin Up's Totally Trees stamp set for the trees...
I hand cut a banner for the (Papertrey Ink) sentiment
The dark brown paper layer is a tone on tone brown print
and the image mat layer is ivory metallic  card stock.
I added background color with Clarity stencil brushes and ink pads.

It's been a while since I have "straight-up" stamped without coloring an image...
I was nice to create a card...for a change...
without coloring with Pencils...alcohol markers...or a combination of both...
(I do miss my water coloring though...and will get back to that again soon)

I was happy what this card 
and wanted to create a similar card...that would be slightly different variation of the card above.

For the second card...I added some stenciling.
Same materials...same supplies..same sketch...
but this time...I stenciled some  detail.....over the brushed on background color.
This stencil design was a nice complement to the stamped tree images , I think.


So, I now have a few sympathy cards  in my "stash"...and a few for my ETSY shop...

But....Some have already been "claimed" by friends who order my cards regularly...
and so..my nicely re-stashed stash...
is in need of replenishing ...again!

I'll find some time this weekend to create a few more sympathy cards...
in between welcoming my "traveller" home...
My daughter has been galavanting around California...and is returning home tonight.
YAY!!
and..did I mention that I have been obsessed with baking Artisan Bread???
Yes...
I have been a bread making crazy woman since discovering No Knead Artisan bread a week ago...
I've been baking multiple loaves of this amazing bread all week long...
a few loaves every day...
and have had a small parade of friends dropping by to pick up a loaf  baked especially for them!
It makes me so happy to bake..and share with friends.

Wanna see?
Plain on the left...
Cinnamon Raisin on the right


I can now add bread baking to my new obsession...along with card making...and doing laundry!

Oh...about the laundry thing...
Did you know that I LOVE doing laundry??
If not...yes, it's true...
I LOVVVVVE doing laundry...
I love sorting it...washing it...drying it...folding it...and I LOVE the smell of fresh clean laundry!
If you visit our house..You'll NEVER find dirty laundry piled up in a heap..or in a hamper...
Everything that we own is always washed and clean by the end of the day.

Now you know my secrets!
Shhhhhh....
Don't let word get out  about me...my cards...the daily bread baking...and my beloved laundry...
People will start talking...
and the word "Crazy" might be part of the talk!

Thanks for visiting today...
Have a wonderful Saturday, my crafty friends...
Now go bake some bread!
Create a card!
or make me proud ....and do some laundry!
Michelle.


Friday, January 13, 2017

Sympathy Cards in Purple

Birthday and Sympathy cards 
are two types of cards that I never seem to have enough of...
whether it be for my own use...
or to offer via my ETSY shop.
and...
right now...
my "stash, for both, is almost nil.

So, I am taking a short break from making Valentine cards
and I'm turning my attention to Birthday and Sympathy cards.

Stampin Up's Gift of Love 
is a stamp set that is always out on my studio desk.
The main floral stamp  is a very nice image...
It can be used as a 2 step stamp...
or...
it can be colored.
(I prefer coloring this image)

I have used the main stamp...a floral...
countless times...for an assortment of cards....
and I've used it again, now...to create a few sympathy cards.

I am also being mindful of my 2017 promise to myself....to use prints on my cards....more often.
So...I colored the image with Spectrum Noir Alcohol Markers...
I hand cut and created a sentiment banner...
(The sentiment stamp is by Papertrey ink)
I added some background color to the image and banner with Clarity Stencil brushes and ink pads...
chose some prints... and metallic card stock for matting
and also, some vellum (for one of the cards)
and ...
this is what I came up with!

I chose to add a small amount of background color...behind the floral image only...
to give the illusion of light coming from behind the flowers.
I used the same ink color on the sentiment banner.
On this card...I chose to add a layer of vellum over the print
which gives a nice softened look.
The image mat is a deep purple metallic card stock.
After matting the image layer...I positioned it with foam..for added dimension.


I'm happy with my choice of placing the vellum layer over the print
It allowed me to get the softened look that I was going for. 


The second card is very similar...as far as the sketch goes...
No vellum on this card, though ...because I wanted the beautiful background print to be fully visible.
The coloring...background coloring...sentiment and banner 
were all created as described above...for the first card


I chose to position the image layer to the right...
to reveal more of the print on the left.
I really like the small gold accents on the print...and wanted them to be visible.
I really love this floral image...
It's simple...but yet has a lot of detail.
I like that although it's one stem...that it has multiple blooms and buds in varied sizes.


So my "stash" now has 2 sympathy cards...
I'll create more of this card soon...but for now...2 of this design/image is an okay start...

Once again...this stamp set has served me well...
ad it will continue to be left out on my studio desk...
because I know that I'll be using it again....soon.

Thanks for visiting, my crafty friends...
I hope that you'll leave my blog today with a little bit of inspiration...
and that you'll find time to create a card or two of your own.
As for me...I've still got a few sympathy cards to create...
because...a "stash" of 2...isn't much of a stash! 

Have a wonderful day!
Michelle.

Thursday, January 12, 2017

Bebunni ...Perfect for Valentine's Day

I've got one more Valentine card to share...
and then it's on to creating birthday and sympathy cards.
And then I'll be back to Valentine cards...
after I build up my Birthday and Sympathy card stash
which is almost depleted.

I inked up the the bunny from the  Bebunni "Hearts" stamp set by Crafter's Companion.
I got out my Spectrum Noir Alcohol Markers
my favorite MFT scalloped die...
my friend thought that the XOXO print wold be great for this card...and shared a sheet with me..
for this CAS (Clean And Simple) card.
I was happy with how the image turned out...
the coloring I was pretty basic...
but then...
(ugh)
While I was coloring...
I got busy talking to my friend who spent the day in the studio with me...
and forgot to switch to a fine tip marker for the string on the hearts.
The Spectrum marker nib was too large for a fine detail like the string.
I wanted to kick myself..
as soon as I touched the Spectrum marker onto the cardstock....
I knew that I wasn't going to be happy with the result 
The string was the very last thing that I colored on this image!!!
UGH....I was SO annoyed with myself.
The big question is...
WHY...oh WHY dd I do the same thing to the other heart string?
??????
UGH
I would like to be able to say that I am feeling very happy with this sweet card.
BUT....I can't stop looking at those 2 strings.
so....I am only 80% happy with it.


But....
On the bright side....
after this goof...
I will NEVER forget to switch to a fine point marker again.
(I am actually going to make another of this card...
just so that I can feel 100% happy with the card...
as opposed to 80% happy.
Bebunni is adorable...
and I think that he deserves a second chance 

But...that Bebunni card will have to wait a few days....
I am setting all of my Valentine dies and stamps aside for a little bit...
As I mentioned above...my stash of birthday and sympathy cards is depleted.

So I am going to switch gears...
to replenish my stash.
I WILL give Bebunni another chance. though...one day next week.

Thanks for visiting...
Have a wonderful day my crafty friends.
Michelle.

Tuesday, January 10, 2017

A Little Bit of Tail Wagging Love

Are you ready for a cuteness-overload?
I hope so...
because I've got a cutie to share with you today.
He's small..
He's brown
and he's got a happy heart and a wagging tail.
The dog image is from an MFT (My Favorite Thing) stamp set called 
You Make My Tail Wag
The upper sentiment is also from this MFT stamp set..
The lower sentiment is from a Reverse Confetti stamp set called 
Whole Lotta Happy
I colored the dog with Spectrum Noir (Alcohol) Markers
The mat layers are metallic card stock (frosty white and black)
The print is an oldie from Stampin Up
(I hoarded a bunch of this print pack back in the day.....and now, sadly...this is my last pack)
The crystal clear sequins are from Pretty Pink Posh

The print has some sparkle to it...with some glittery sparkle on the white heart flower-like design.
And..although its difficult to see in the photo...
The frosty white metallic layer under the age was embossed with a heart patterned embossing folder
The  lower sentiment is from  Reverse Confetti's Whole Lotta Happy stamp set
It's a super-fantastic stamp set because it includes many sentiments for specific occasions.
I almost always keep this stamp set right on the studio work table and have used it on countless cards. 


I feel like I always say this here on my blog...
and today...I'll say it again...
I had fun creating this card!
It was fun putting together this sketch...and it was lots of fun coloring the dog image.
(and yes.....in case you're wondering...I created identical multiples of this card)

Thanks for visiting!
Have a wonderful day, my crafty and creative friends!
Michelle

Monday, January 9, 2017

Creating a Card Around a Beautiful Quote


Today...I've got a quick blog post to share...
with a short background story.

Here's the very short background story:
Yesterday, I shared a card here at my blog that included a beautiful quote.
I loved that quote a lot...and wanted to use it again...
I knew immediately which stamp I wanted to use for the quote card. 
I got out the stamp...
I stamped the image
Got out my Spectrum Noir (Alcohol) markers...
Colored the image.
Added some background color 
(yes, with Clarity Stencil brushes and ink pads)
I chose two colors of metallic card stock for matting
( green and bronze)
Positioned the matted image layer with a piece of self adhesive fun foam...
and...
wha-la!
I created a card that started with the starting point being the sentiment (in this case a quote)
as opposed to the stamped image being the starting point.


It was fun coloring this image..
I wanted the pants to be a denim-like color...
and didn't have a marker that would give me a good base for that color...So...I experimented with a few colors in both the blue and the grey family...
and was able to create a color that was exactly what I had in mind.

The image is by Impression Obsession
The quote is from a company that is no longer in business
(I am SO glad that I ordered a whole bunch of their sentiments and quotes 
before they closed their on line shop)
I have used many of them...many times...
and I'm thinking that I will most likely use this quote stamp many times as well.

Thanks for visiting , my crafty friends!
Wishing you a wonderful Tuesday...
A day that allows you to enjoy some creative time of your own!
Michelle.

Sunday, January 8, 2017

Highlighting and Shading Alcohol Marker Coloring with Pencils

Many years ago...
when I had a small collection of my first Copic alcohol markers...
(Too few to blend and shade adequately)
a salesperson at a local Pearl Art store suggested that I combine Prismacolor pencils and alcohol markers..to get lots of shading and color variation.

I went home that day...
and got out my little tin of Copics...and my big tin of Prismacolor pencils...
and gave it a try.

I was thrilled with the result that day...
and...
I have used this technique countless times over the years when making cards.
I've tried it with an assortment of pencils...
and an assortment of markers
(alcohol..and non alcohol)
and.....it works beautifully every time.

Recently...
My personal Santa (aka Gary) 
gave me the complete set of Faber -Castell Polychromos pencils for Christmas ...
along with a back up set of the complete set of Prismacolor pencils
(I already had the full set...but a back up set of duplicates is always a good thing...
especially because I color images...a lot
"Santa" also surprised me with a whole lotta Copics...
(YAY!)

I also had a gorgeous Catherine Scanlon stamp that I hadn't used...yet...
so I thought that I'd give the Polychromos  and Copics a try.
I've combined Prismacolor pencils and Copics in the past...but never Polychromos and Copics...
So I was really looking forward to trying this combination out.

I've used the Polychroms alone...and love them..
They lay color down sooooo smooooooothly.
So I was thinking that they'd work well over copics.

And..
they did!
What do you think?
(**NOTE: Next time I will choose a different green Copic....a shade or two darker..
This green is okay.....but not perfect ...to my liking)
Still...I love how this card turned out...
even with the "green issue".

If you like this look...
give it a try!
You'll need some Ultra smooth card stock...
(I use Spectrum Noir Ultra Smooth Card stock...it's Copic friendly...
and it's ideal for pencil coloring because it really is.....Ultra Smooth)

Start out with stamping and image with Memento Ink...
Then...color the image with one chosen Copic/marker color...
then shade and highlight with pencil colors over the Copic color
and....That's it!
Simple and easy!
and..
if you have a small collection of Copics...
Shading with pencils will expand your color palette....enormously.

I used Clarity Stencil brushes and a Stampin Up ink pad 
to add some background color around the flowers.
I didn't ink the area around the quote because I wanted it to be highlighted by a white background.


Here's the Catherine Scanlon Stamp that I used when creating this card...
*All of Catherine's gorgeous stamp sets....along with this set called  Words of Wisdom 2 
are available on line at:
I didn't include info about the quote...
because the company that offered the quote stamp is no longer in business


It's always a great day when I get to create some cards..
and it's an even better day when I whip out one of my Catherine Scanlon stamps
and enjoy creating a card.....or 2...or 10...with it. 
Creating this card allowed today to qualify as being....
 "one of those days"!

Now it's time for YOU to get out your markers and pencils 
and...
it's time to give this coloring technique a try!
Thanks for visiting...
Have a wonderful day my crafty and creative friends...
Michelle.