Tuesday, May 22, 2018

Something Pink...for a PURRincess

Hello my crafty and creative friends!
I've got a fun card to share with you today...
and...
If you like pink...
You've visited the right blog today for your daily dose of pink!

A friend asked me to create a birthday card...
(and I needed to get t done in a flash...and sent out in the mail ...ASAP)

My friend told me 3 things about the recipient.
1. She LOVES PINK
2. She LOVES Hello Kitty
3. She LOVES cats.

My friend sent me a photo of the recipients desk...where they work
as proof of #'s 1..2 and 3 noted above
(I clearly understood what #1...#2 and #3 were real and valid!)
So...
I went through my stash of cat stamps and dies...
(I have nothing Hello Kitty related)
But....I do have a large collection of cat stamp sets
I knew that I'd be going with pink...
Lots of pink.

The Purrincess stamp set (by The Ton Stamps) caught my eye.
So I got out some pink Copic markers...
some Pink dotted print paper...
and got busy making a card!
and...
this is what I wound up with...
(No Hello Kitty...but that sure is a cat...and the card sure is pink!)

I colored the image...
added a sentiment...
die cut the colored image with and MFT Scalloped Rectangle Stax die
I matted the print with metallic card stock...
and chose deep pink card stock for the largest mat layer.
The die cut image piece was positioned with fun foam for added dimension...
 To finish the card... I added one small rhinestone to the tiara.

When the card was complete...
I sent a photo via a text..to my friend who requested the card...
and she loved it!
(I hope that the recipient loves it too)

I really enjoyed creating this card 
with this great little Purrincess stamp set
and am thinking that I'll create a few more for my card-stash.
(All in pink...of course!)

Thanks for visiting today...
Wishing you a terrific Tuesday!
Michelle.
Sunday, May 6, 2018

Water Colored Dahlia Garden

Hello my crafty and creative friends!

Today I'm sharing a few cards here at my blog...
Similar...but different..
each heat embossed....water colored...and created 
with the (gorgeous) DAHLIA GARDEN BACKGROUND stamp from The Ton Stamps.

After stamping the images with VERSAMARK INK
I heat embossed each image with Sparkle n Sprinkle's 
FINE DETAIL GOLD EMBOSSING POWDER
I chose an assortment of ALTENEW INK PADS for water coloring...
painting the images with traditional paint brushes.

After the images were water colored
I die cut the center of each image...
Chose card stock matting colors
and sentiments from the PENNED SENTIMENTS 
and ANEMONE WISHES stamp sets.
(Both...also from The Ton Stamps)
I then matted each of the water colored pieces...and the 3 sentiments.
I positioned the center piece of each Dahlia image with fun foam, for added dimension.
To finish each card, I placed the sentiments 
in the lower right corner of each card.

I am a lover of using metallic embossing powder 
to heat emboss images that I will be water coloring.
I  love the look...the shimmer...and the contrast of the shining embossing
against the matte look of the water coloring.

So now...
I've got a few photos to share...

The larger-than-card-front-sized Dahlia Garden stamp
is really my kinda stamp!
(If you follow my blog you  already know that big floral images are a fave of mine)

Water coloring this image was lots of fun.
The large image offers lots of opportunity to blend and mix colors
to create a collection of compatible and beautiful colors.

Look at that gold shine!
Thank you fine detail gold embossing powder!
You never fail me!

The color palette that I chose for the second card
is similar to the palette of the first card (above)....
Pink tones...
but this time...with the inclusion of a lavender...and a purple bloom.
   
Dark purple metallic card stock was ideal, I think..
for the first card...
and this card as well.

and...
here's the beautiful gold heat embossing again,
What a great way to bring attention to the details of this stamped image.

For the third and final Dahlia Garden card
I chose to create a pink...rose...coral and yellow color palette.
I chose a deep coral card stock for matting

After creating two cards in the pink/purple family...
It was nice to switch gears with the ink colors used to watercolor this card.

A nice view of the matting...water coloring....image details...
sentiment and shine from the gold heat embossing 
on this coral toned version of Dahlia Garden.

When I'm in my studio...
creating cards like the cards that I've shared today
I am in my truest of happy places.
To create color...blend color...
and to watch the magic of  ink and water interacting
always brings me enormous happiness...peace...and lots of joy.
(Confession: If I had my way...
I'd create cards with images like Dahlia Garden...every day.)

Thanks so much for visiting today...
I hope that you've found a little bit of inspiration here at my blog today.
Wishing you a wonderful day!
Michelle.

Saturday, May 5, 2018

Masculine Cards

Hello my crafty and creative friends!

I've received some requests from card making friends 
asking me to share some ideas and inspiration for creating masculine cards.
Instead of emailing photos and/or sharing photos via Facebook...
I thought that I'd just put together a quick blog post...
so that lots of masculine card photos would be shared in one place...
(Or as I call them..."guy cards")

So...today...I'm sharing a sweet and simple blog post that's jam packed with cards 
that I hope will bring some inspiration and ideas 
to those who are looking for "guy card" ideas.

I'll share photos for sketch ideas...and stamp element ideas..
(but I won't be sharing product information today)
I am hoping that if if you find some inspiration in any of today's cards...
that you'll tap into your creativity and your own stamp stash to create a similar card
with your own stamps and supplies...and sentiment stamps that you might have on hand
(** I'll include a sentence or two with some basic info)

So...here we go...
a trip down memory lane...
with "guy cards" that I have created in the past.

Some silhouette stamping on a print background
and hand cut sentiment banners

Water colored boathouse scene...
water colored with with water color pencils
Metallic card stock matting layers

A die cut card
Silver, black and red metallic card stock
Heat embossed silver sentiment and embossed matting layers
Silver brads used to embellish the die cut sentiment banner
   
A favorite old Stampin Up stamp set
Focal images and background print were all created with the stamps
I stamped and then hand cut the aviator goggles 
and positioned them with foam dimensionals

Another die cut card
using black...copper and silver metallic card stock

A die cut card
Large red mat layer is embossed
Card front is not as wide as the back of the card
allowing the double matted car layer to extend over the inside of the card when closed

Mare and foal...
A water colored image
Assorted ink pads used for water coloring
Metallic matting in bronze and chocolate brown

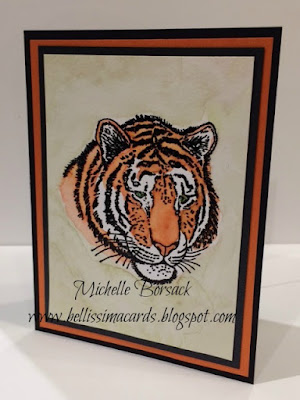
Tiger portrait...Water colored card
using ZIG markers and a water brush
and Multiple metallic mat layers

Lighthouse scene...Image colored with water color pencils
Knotted twine used as an embellishment
All matting layers are metallic card stock...
(Red...white and blue)

Another water colored lighthouse scene card
Twine used as an embellishment
Mat layers...metallic card stock

A quartet of die cut motorcycle cards
2 top cards:
Matted motorcycle layer was positioned over a split card front
(top of card front and bottom of card front are two separate pieces..
held together by the matted motorcycle piece
2 bottom cards:
Traditional fold
Metallic die cut motorcycles and matting.....on print backgrounds
 Black gold and burgundy metallic card
Die cut gold metallic dog
Paw print embossed black metallic ayer

Country lane scene
Black heat embossed image
Water colored with water brush and ink pads
Metallic card stock matting in green and black

Image from an older Stampin Up stamp set
water colored with Zig markers and a water brush
Matte card stock in green and brown used for matting

And finally....to finish up today collection of "guy cards"...a few more die cut cards...
Metallic card stock die cut cars...
hand cut banner banners...
Used both prints and metallic card stock for layering and matting


Thursday, May 3, 2018

You Make Me Smile

I've been chipping away at "attaining" ink, stamps and dies
that have been on my card making "Wish list".
You can imagine how happy I was to receive a box of goodies 
from Gina K & The Ton Stamps...
BOTH on the same day!

So..
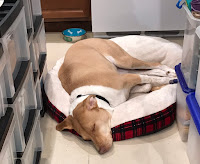
Last night....my buddy Jackson and I took ourselves out to the studio...
When he wasn't by my side "supervising" my card making...
Jackson dedicated his time to enjoying a new bone that he got for his birthday...
and napping...
and I got busy stamping some images of Gina K's YOU MAKE ME SMILE stamp set
with her new AMALGAM INK.

But first....it was all about taking a photo shoot...with my buddy


Then...
I got busy stamping...and coloring!

I remember that in a video Gina (K) had mentioned that the Amalgam ink
requires a little bit of drying time.
So, I stamped out a few images with my MISTI and laid them out on the studio work table to dry
while I picked out the Copic colors that I wanted to use.
The AMALGAM ink stamped a nice defined clear image
and I'm excited to know that this same ink is compatible with Copic coloring 
as well as water coloring.
(My 2 favorite ways to color stamped images) 
After the image was colored...
I added background color with CLARITY STENCIL BRUSHES and an INK PAD.
I chose a print that I thought went well with the image and the colors that I chose.
I matted the image, print  and sentiment banner with matte black card stock. 
and..
this is what I wound up with...

I am a lover of floral images 
and immediately fell in love with this stamp set when I first saw it on Facebook.
For me...adding color to beautiful floral images 
is the kind of stuff that sends me to my card making "happy place".
This gorgeous image from the YOU MAKE ME SMILE stamp set
is a "happy place" image for me!
The stamp set also has an assortment of wonderful sentiments...
Choosing one for this card was a challenge...
because...I love all of them.
But...I chose "for you"...stamped it...hand cut the banner ...matted it...
and positioned it with foam dimensionals.
The matted image layer was positioned with fun foam for added dimension.
I wanted the flowers to remain in the forefront...
so I kept the background color light...

I finished the card with crystal sequins
(a change of pace for me...because lately I've been using Nuvo Drops a lot)

I've got a few ore of this image sitting on the studio work table...
ready to go when I am back in the studio again!
Some are stamped with the (wonderful) AMALGAM INK
and some are heat embossed and waiting to be water colored.

Thanks for visiting today, my crafty and creative friends...
Have a terrific Thursday!
Michelle.

Wednesday, May 2, 2018

Revisiting Silhouette Card Making

It's been AGES since I've created cards with  a silhouette-style image.
I thought it was time to get back to it!

I have had Penny Black's FALL RENDEZVOUS XL TREE BIRDS
for a very long time...but have never created a card with it.
So...I thought it was time to ink it up.

I started out by creating background color 
with CLARITY STENCIL BRUSHES
and INK PADS.
Next...I used my MISTI to stamp the large image.
Because the image is very detailed and I wanted a nice dark silhouette I re-inked the stamp multiple times and re-stamped until the image was dark, crisp and solid
(Like a silhouette image should be) 

To finished each of the 4 cards
I matted the images with black card stock and
I chose an IMPRESSION OBSESSION Emerson quote stamp
as the sentiment

When the  cards were completed...this is what I wound up with...


I really enjoyed creating this little stack of silhouette cards.
They fit right in with my love of CAS card making
and I am always happy when I ink up a stamp that I've had for a while...
but have never used.

Thanks for visiting today my crafty and creative friends.
Wishing you a wonderful Wednesday!
Michelle.